Showing posts with label wip. Show all posts

Wednesday, August 28, 2013

It's Imagination that Brings me Back to Reality.


Beyond Imagination 
It's Imagination that brings me back to reality. 


Over the last year I have been retraining my art style to meet the needs of the art community. I wanted so hard to show that I belonged in the professional world. Growing up when ever someone would introduce me as an artist they would say yeah this is Derrick he draws monsters and characters and stuff. I have heard the phrases weird, odd, strange, goofy, and all I heard was limited. I really felt off because I didn't want to be limited. In a business sense people buy art based on the artist's name. My name was synonymous with the words listed above, and I felt if I was going to sell anything I thought I had to get out of that cage. 

I started to draw the large animal pieces like Bird in Bloom, and The Flight of the Macaw using reference shots, and composing them originally. These pieces really hit big with the community, and got my name out. I won my first art show with the Bird in Bloom as best in show, and I was saying to myself, maybe they were right all along. I really limited myself by drawing things I loved all the time. Do I really have to draw from life, and make the images look real to get noticed? Over time I drew more realistic pieces like the Dolphins in the Reef, and I started to feel chained up. It didn't feel like drawing anymore, and I didn't want to do it. I took a good month off of drawing, until I had a vote on my site about what animal I should draw next. The results came in as a horse. As we all know there are millions of horse art all over the web. I was kind of reserved about drawing one, until I had a thought. In my mind I found a glimpse of the image I was going to draw, and I was energized again. I had drawn horses many times before. In my animation class we had to draw hundreds running, and jumping, flying you name it. For my horse I wanted power so I drew Hraunkot a horse born from the lava enriched ground. It was this moment that it dawned on me, I missed my imagination. 

I put my foot down with this next piece, and gave myself some rules. Other than looking at my hands and drawing them on the paper, I would draw random images without looking at anything. This piece would be called "Beyond Imagination." 

DAY 1: Today I charged in and set up the paper with the border, and the outline placement of the hands. In my head I envisioned an image coming to live born from the paper. To show this I did something a bit different and drew the picture in both pencil sketch, and colored pencils.  The first thing that came to mind was a dragon. Something that could be large and small at once just setting the tone for the picture. I drew the dragon climbing off the paper using my arm as a stepping stone, almost like it's getting ready to fly off the paper. To blend the two worlds of art and reality I added a yellow & red burn effect ass the color and grey-scale start to blend together. 


Day 2: Each day I like to add just one more subject to the drawing so I can focus on one at a time like each part is it's own piece. Today I decided to throw in a flying witch, who also resembles a sorceress. In my character designs I like to add detail. But it has to be detail that makes since. In this case I added small but intricate designs on her outfit that you may see, and purple is my little three year old's favorite color so that worked out too. I think this part of the picture works nicely because she adds movement to the dragon. Almost saying charge. 


Day 3: This is probably my favorite part of the picture. The rising phoenix that comes off the page. Originally I drew the phoenix much different. It was all flames that came out of the clouds in the form of a bird. I looked at it, and said nah it just wasn't me. So I imagined what I thought a phoenix may look like in my imagination and the result is what you see below. You can see the heat coming off the ancient bird, and at the same time the magic. I had the markings look as if they are illuminating, and the feathers glowing on fire. And at the same time it looks like it could fly. You can't see it yet, but I have him flying out of the border as well. It just ties everything together. 


Day 4: As I was drawing the left side of the page, I couldn't stop saying "Release the Krakken!" I remember drawing a Krakken as a kid, and it looked something like this, of course a lot less detail then. I wanted to add some adventure to the drawing, something like that of pirate adventure story. In this adventure the Krakken was so big it folded the drawing paper creating a tidal wave. It started to look like a drawing, inside of a drawing....coming alive out of a drawing..while I was drawing...yeah something like that. ( I think I hurt myself.) 


Day 5: I love it when a drawing just comes together towards the end. At this point it's really hard not to pull an all-nighter and blaze through it. But that is when you begin to rush and make mistakes. Today I started drawing the paper.on the paper (not that again.) and really defining the stylish clouds. We have all been told to get our heads out of the clouds, and that is why I drew everything in the clouds. From the volcano exploding swirled smoke, to the ocean splashing the cloudy waves against the rocks. It was all dreams and imagination coming to life. And what are clouds without the sky, and a rainbow shooting across the sky. I added a rainbow forming into shooting stars to merge the waves and the night sky. The final touches are all sketched out, and ready for tomorrow. 


Day 6: And it's the final day. A good six day project that was a whole lot of fun. Not only did I complete my challenge but I found a lot of me that I lost in the process of creating this drawing. Have you ever had that moment where you were worried about messing up a part of your drawing, and turns out to be the best part? I did, and I am very happy with the hands. You can't see it in this picture, but I got all the little hairs on my arm, and the ring metal was spot on. I even cast the shadow onto the paper using my desk light as a guide. Once finished I moved onto the space area, and the paper. I wanted to make the paper..on the paper (here I go again..) look like parchment. So I used browns and golds in with the grey color. With that final touch it all came together for me, and I am very happy with it. Once I get a better picture of it, I will add it to my shop, and have it ready for prints for all who are interested.

I am really glad to have you all here reading this as I share my thoughts with you all. Each drawing is an extension of you as an artist. A poet writes her thoughts, and puts it all out there. A Photographer uses their camera to show the world how they view it, and writers can pull you into their world. We use pencils, and brushes to build and shape the paper into the world as we see fit. And that's why I came up with the saying, "A World Beyond Imagination is Only a Sketch Away."
I am glad you enjoy my work, and my world of imagination, and I would like to do more pieces like this, as well as commissions, and real life studies. A good balance makes an artist happy. do what you love, and don't get caught up with your love for art becoming work. It can hurt your artwork, and limit your abilities.

Have a great day,

Derrick Rathgeber
Derrick the Artist
http://Derrickr.webs.com


Wednesday, August 21, 2013

Don't Let Life Hold You Back.

It's been a while since my last post. There has been a lot going on in my life that has put a strong hindrance on my ability to focus on my artwork, and website. As most of you know I don't make a living off of my work, one day I would like to, but for now it is a fun hobby. I enjoy all the feedback, the chance to share lessons with you all, and of course any advice I can give.

I feel lately that I needed some advice and help, and I wasn't getting that in return. I reached out, and got nothing. I'll admit part of me was really bitter and spiteful. I ran scenarios in my head wondering how convicted killers could get donations in the thousands for the best lawyers, or how people come together to build a brand new home for someone that already has a nice trailer home, because they felt it was too small for them. I didn't understand and I was going down a really dark road in my head. I think the nail in the coffin was when I asked a company I have been supporting all this time with free lessons, and promoting their products with my artwork completely blew me off. All the plans we made in the beginning for a duel artist pencil sponsorship and advertisement went right out of the window after they got what they wanted. A free art lesson from an artist that used their pencils because it was all he could afford. It's not the first time I have been burned by the big corporations either, but that is many other stories, and I don't want to be that guy anymore. I am done reliving failures, or believing I have have failed due to my situation.

Regardless of where I am in life I have to remember that others are either in the same position I am in, or worse, and I have to remember that they look up to me. I felt recently that I let those people down because I cracked under pressure. I stopped drawing, and I stopped making lessons. I just froze up. Just know I am still here, and I have more work to show. I have more help to give, and I look forward to helping again. I am sorry I was gone for a while, but I am back, and I don't want to let life interfere with my love for art ever again. I may need some help with that.

I just need to know that what I do here, and on the web is worth it. I pour hours into the lessons, and I don't ask for money like other sites or artists do. If it helps you learn a technique that improves your work that is my payment. In time I will eventually make a book, but for now I just like to help out because I know there are artists that cannot afford to pay for lessons. The same for my comic strips. They make me laugh, and I am happy to know that it made someone laugh. And my artwork, I plan on drawing some more again, in fact I set up the paper for a new piece today. It will be a black and white and that is okay with me. I am going to stop placing rules on my artwork, all that did was hold me back, and make me unhappy.

After all of this I am in a better place. Looking back on what I wrote I feel that I needed to get somethings off my chest if I were to continue. I am going to start drawing for me for a while, and I promise to share new lessons. In fact my daughter gave me the idea for the next lesson. She wanted to learn how I draw trees so fast and realistic so look forward to that in the near future. My next piece on the other hand, you'll just have to tune into my Facebook page for updates, and work-in-progress images. What I can't give out all the details right? I didn't go away for good, but I did fall asleep for a bit. Thank you for sticking around and supporting me through it all. I have learned one all powerful lesson in all of this.

Support doesn't always come in the form of a dollar sign. Your kindness, comments, likes, and just all around support for my work. It helps make everything I do worth it, and I cannot wait to do more. I am not going to let life's obstacles hold me back anymore.

Thank you,
Derrick Rathgeber
http://Derrickr.webs.com
http://Facebook.com/DerrickRathgeber
Donations Accepted


Saturday, July 6, 2013

How to Color a Daisy With Colored Pencils by Derrick Rathgeber


How to Color a Daisy With Colored Pencils
By Derrick Bruno

Thank you for your Donation & Support!


https://www.pinterest.com/pin/60869032437031919/

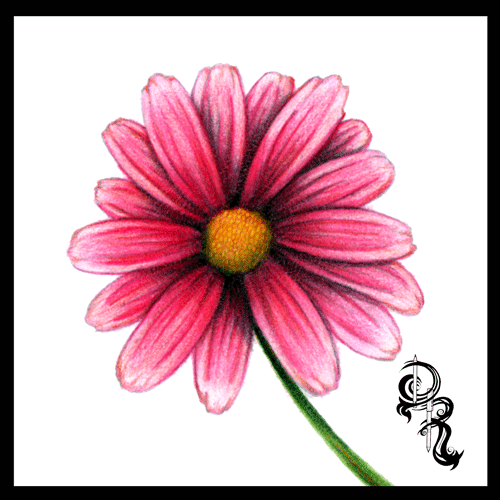
Welcome to the next lesson in colored pencil drawing. In the last lesson we learned how to layer different colors to create a solid multi-colored pink lady apple. In this lesson I will teach you how to train your brain to see your drawing as different individual pieces. The perfect way to do this is with the daisy. We will focus more on directional shading and coloring in this lesson, and how to obtain textures using different strokes.

Grab your box of Colored Pencils out and grab the following colors; Pale pink, Pink, Cerise, Ruby, Light Brown, Golden Yellow, Grass Green, Black, and White. These will be the 9 colors we will be using for this lesson.

Tip: If you would like to change the color of your flower, you may substitute the petal colors (Pale Pink, Pink, Cerise, & Ruby) to another four colors. Just make sure you go from light to dark. For example a purple flower you could use Light Lavender, Lavender, Purple, & Orchid. 

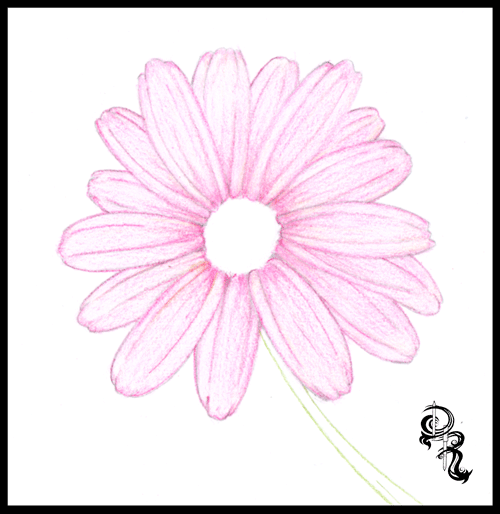
Step 1: Lightly draw your daisy using faint strokes of a pencil, or light grey colored pencil. Start with the circle in the middle of the flower. Follow that with about six individual petals all roughly the same length, but different characteristics. If you note each petal has two fold lines going down the, and the ends are jagged. Behind these petals you will draw more petals. Continue layering your petals until you are satisfied with the shape of your daisy. Now use the Grass Green colored pencil and draw two curved lines for the stem.

Tip: If you would like to skip ahead and focus on the coloring lesson. You may download the sketched out image seen below. Click the link Below.


Step 2: We are going to put down the base color for the flower. Take the Pale Pink Colored Pencil and start coloring in each petal. Now to do this we are going to use a fun technique. The reason I chose a daisy is because it’s a circle shape. You will want to color in the direction of each petal; to do this can get frustrating because you have to contort your hand into uncomfortable positions. So what we are going to do is keep our hand in the same position and rotate the paper. Use light gentle strokes across each petal evenly, and use more pressure on the lines, and towards the center of the flower. Continue rotating the paper and coloring each petal until they are covered.


Step 3: Practice Makes Perfect. Find a petal to start with, and start adding the next layer of color. Using the Pink we will start off at the base of the petal and color in the direction of the petal. Color only the base of the petal and the center area of the petal. Again rotate the paper as you go and color in a position that is most comfortable for you and your wrist. This will allow smoother lines and more control.


Tip: Treat each petal as a new drawing. Taking your time and giving attention to each one will allow your brain to see shapes that you would otherwise over look. Remember to draw comfortably, take breaks when you need them, and just have fun.

Step 4: Using the Cerise you will continue adding more color and depth to the flower. We are going to start adding some shadows and curves to the petals. Color from the base of the petal with more pressure and lighten your strokes as you reach the end of the petal. Define the shadows for the petals underneath by using darker strokes where the top petals overlay.


Step 5: We are going to fine tune the shadow by adding one more red color. Using the Ruby Colored Pencil we will once again add more depth the flower petals. Rotating the paper as you go of course, sharpen your lines toward the base of each petal around the circle. Then define the lines of each petal using the Ruby color. Now as you rotate the paper use back and forth strokes to really get the dark Ruby color to make an even shadow on each petal towards the center of the flower to make it look like the petals fold inward.
Step 6: Now we are going to get into the middle of this flower. Don’t worry no more rotating the paper for this one, unless you want to of course. This part is actually kind of fun for me. Making a realistic pollen look is easier than it looks. Using the Light Brown find the center of your circle and make a much smaller circle. This will be your starting point. Now continue making small circles around this circle, and continue until the center is full. Once you get to the edge of the petals, use the Light Brown to fill in any gaps between the flower center and the petals. Now add some of this brown to the stem with some lines dark lines, and we will move on to the next step.


Step 7: Now it’s time to add some color to the center. Using the Golden Yellow make even circular strokes to fill in the center area. Continue going over it until you get a nice even color. Once you are finished use the same Golden Yellow color and very lightly go over the base of each petal. We do this because light reflects colors onto nearby objects. Sometimes it’s not noticeable, but just enough will make your drawing look that much more realistic. Then to finish off this step add some more light stroke lines onto the stem to give it an earthy browning like color when we go over it with the green.


Step 8: Probably the easiest step of the drawing. Take the Grass Green color, and color the entire stem. Be sure to color right over the Golden Yellow and Light Brown colors. Remember to color along with the shape of the stem in the same direction. You can even rotate the paper to give you a comfortable position and clean lines. Color the area by the flower darker show the shadow of the flower covering the stem.

Tip: By now I hope rotating the paper comes to you as a reflex. This will help you draw strait lines and curves, and can be used to draw all sorts of shapes and objects. Draw smarter not harder.


Step 9: Now to cast the final shadows. Use the Black Colored Pencil and outline the base of each petal and the flower center. Next begin shading the top petals lightly just enough to show that they curve inwards towards the center. Add some more black color to the petals underneath using the top petals as a guide. Next tilt the black pencil to the side a bit, and give a shadow to the center of the flower. Use crosshatching strokes towards the bottom of the circle to make it look like a sphere. Finally cast the shadow on the top, and down the side of the stem to finish up the shadows.
Step 10: To finish up our flower take the White Colored Pencil and color the edge of each petal. Next blend together the light and the dark colors by coloring from the edge of the petal down to the middle of each petal. This will even out your colors, and help cast light onto your drawing. Next add white to the cent of your drawing, and to the stem. And there you have it a beautiful flower.


Tip: Find your light source. Sometimes when I draw I will cast a light over my drawing and see which way the paper casts a shadow. Use this as a guide for your shading.

That does it for this lesson. I would love to see your work. Send it to us and we would be glad to share your results on my Facebook page at http://Facebook.com/HalfEvilProductions

Sunday, June 30, 2013

The Flight of the Macaw: Colored Pencil Drawing by Derrick Rathgeber

The Flight of the Macaw
by Derrick Rathgeber


The Flight of the Macaw was one of my greatest pictures as an artist. I not only completed this piece in a good time-frame but I used over 40+ colored pencils. Composing this image was no easy feat at all either. The reference shot I had was small and blurry, but the pose fit what I was going for. I used other references such as encyclopedias, and zoology books to get the bone structure, and muscle movements down. In this blog I will be giving you a day by day play into the creation of this piece. 

DAY ONE

And the macaw spreads his wings. There is something releasing about sketching the picture on the paper. It can be difficult to start a new project sometimes, and I know once I start to draw the piece I know it's on. I found a good composition in this image that followed a line of action. It gives the illusion of the birds movement, and flight path which is right off the page. I started to color the head and saw the clock, time for a break. 

DAY TWO

I really jumped right into this piece. I felt an immediate connection, and after the success with the Bird in Bloom piece I really wanted to improve more. I used about 4-5 pencils to get a good bone color in the beak. I started to work on the creases and noticed that after I colored in the eye, I felt him staring right at me with almost a grin. Although the camera I used picked up more white than it should have, you can still see the layers of colors I started to put in. I wanted to give this bird a bit of my personality, and you can see that with the yellow to red flame coloring I put in his feathers. 

DAY THREE

Something happened today that was a bit unexpected for me. I found detail that was not in the reference picture. My dad in Costa Rica took a far away shot of this bird in flight and it was very blurry. You could say that I winged it...pun. Seriously though I stopped looking at the photo at this point and just colored. I saw the form of this beautiful bird and knew where I wanted the muscles to flex, and even more I wanted to feathers to fluff out as if he had just flapped his wings, and you get that hint of back-draft. I also went right into the shading too. I don't usually do this until I shaded all the base colors, but like I said something just came over me today, and I was on fire looking forward to tomorrow. 

DAY FOUR

Back to what I was talking about in day three. The muscle definition. I think that was my primary focus on this piece. Not only did I want to see how many colors I could put in it, but I wanted to see how many feathers I could ruffle, and muscles I could flex. The one small challenge I found was the molted white feathers on the legs and by the wings. With colored pencils you cannot just color white over red and expect white. So I had to color around these areas using negative space, and then using small strokes to add the detail of them being white feathers. I did this with grays and browns. After adding some lights and shadows to this point I think I was done for the day. 

DAY FIVE

Today the macaw started to fly. Can I admit one thing, I actually go so nervous before I started the wings that I took a day or two away from this piece. after I put so much detail into the body I couldn't mess up on the wings. That would be the end of it. So I started on the feet. Believe it or not the feet were harder than the wings. I had to get a movement that made sense as well as give them some texture. The color was interesting to, I would say between the blues, grays and tan colors there were about 7-9 colors in the feet alone. That's why I love colored pencils. Just by adding one more color in a different direction or stroke you change the look and feel of what you are coloring. It may take longer, but you have total control. As for the wings I think the most difficult part was the angle of the feathers and showing the wind pushing down on the top feathers, and lifting the bottom. to do that I added a curve at the end of each feather, and moved them as I visualized the bird in motion. You have to do this, create a line of action and engage the audience. You have one image to capture their imagination, by drawing them into yours. 

DAY SIX

Ah the right wing. This wing was killer. I almost made the mistake of thinking the macaw's feathers were blue on the top and bottom. After looking it over I found they were just a darker color of red. The feathers are actually layered, and their blue feathers are on top. That being said I really thought I would have more blue in this picture, but If I am going to make it believable you have to do your research, even if you are making it your own. Now if you are drawing directly from your imagination, which I love, then all bets are off. This is the funny part I made sure that I placed the blue on the second wing anyways. I changed to composition to have this wing come off the border. It solved two problems for me, One I needed the wings to match up in color, and Two this was a perfect line of action that made this draw much more interesting. Now I was ready to move forward. 

DAY SEVEN

This is the phase where most of artists start to crash. The final lap of the finish line, and you fear finishing. Part of you wants to push harder just to end it, and the other halve just wants to put it away and never finish it because you fear the success or failure of possible messing up. This is where you have to be cautious and take breaks. For me I told myself I would just do the log for the day, and as hard as that was I did it. I added the shadows, and different colors of browns to get the color I wanted. A voice poked in to my head saying just color in the shrubs and be done with it, I know that would have been a big mistake. I was tired, and my wrist was hurting, and I know I would have skipped details, and just rushed it. So I gave it one more day. I originally attempted to draw this 18" x 24" colored pencil piece in 7 days, but I would rather add one more day and be happy with it, than ruin it but trying to hit a deadline that I placed on myself. 


DAY EIGHT

And with the large brush in the background with the skyline, this piece is finally completed. I think this piece cemented me into a good spot as an artist. What I accomplished fore myself was just priceless when I finished this macaw piece. I used over forty colored pencils, and I did it in eight days. It was a good feeling to know I did that, and I wanted to do it again. I continued making new portfolio pieces here on out, and rebuilding everything. If you think about it The Flight of the Macaw was me. I was spreading my wings and letting the wind take me. All the way trough I animated him in my head watching him move, and I think that made the picture take form and move with me. 

Thank you very much for following me on this piece, and remember prints are available at http://fineartamerica.com/featured/the-flight-of-the-macaw-derrick-rathgeber.html

Also if you are in the Riverside, California area between now and August 2013, you can catch The Flight of the Macaw along with three of my other pieces live in the Artscape Gallery located at:

ARTSCAPE
The Riverside County Administration Center
4080 Lemon St.,
Riverside, CA 92501

For more information visit my website at http://derrickr.webs.com
or contact Rachael Dzikonski via email at rachael@riversideartscouncil.com.


Thursday, May 30, 2013

The Angel of Death - Day 4


The Angel of Death - Day 4

With the wings added the picture is already telling the story. Today I will be adding the background, and get to the lighting of the moon. The wings were a blend of black, dark grey, metallic silver, and white. I wanted to give it a dark feathery look, while adding the  glimpse of shape and personality to the wings. 

Visit http://derrickr.artist.cm for more. 

In Feed AD