Showing posts with label new art. Show all posts

Sunday, November 24, 2013

New Artwork - Rebirthing by Derrick Rathgeber

Title: Rebirthing
Medium: RoseArt Colored Pencils/ Bristol Soft White 11" x 14"

As I was going through a lot of my old drawings from years ago, I came across a fairy picture I drew. It was a large one using both markers and colored pencils. After going over it I was instantly inspired to do a new fairy picture. It had to be completely new and show how much I have changed as a designer and artist. To me it not only had to work, but show some sort of action with lots of colors. 


So where do I go to get some ideas? Not the drawing board, but the sketchbook. When I have an Idea one of two things happen. A whole lot of very messy broken sketches, or a drawing that just stands on it's own. This time I just nailed the look I was going for. I wanted a fun pixie type fairy that lived in the forest, or garden. She had to look like she lived outside, and used materials that she found to dress herself. So for her clothing I used grass, small twigs, string, flower petals, and leaves. I didn't color this one because I wanted to get to the scene I wanted to portray, and I didn't want to draw another fairy just sitting down either. With my basic design and idea ready it was time to start drawing my new piece. 


My new fairy was gaining a life of her own. As I drew her out a lot of things changed, which usually happens when I start new drawings. In fact in this drawing the entire concept changed about three times. I made her more of a motherly yet youthful looking fairy, and taller. Having done this I wanted to show why so I have her flying in mid air raising her hand up in a strong tall pose. This is my favorite part of drawing. It's letting go and drawing a new character design from nothing. You create personalities and life on the paper. I will say one thing though I do go through a whole lot of erasing. 


I already knew that I wanted to do more of an earthy tone to this piece. To do this I used a whole lot of brown, and dark browns instead of black for shadows. At the same time I still wanted to have her very colorful and vibrant. I used about three greens just for the small leaves alone, on top of the burnt sienna, and brown. Using colors over colors gives you the bright colors that you would never see using just one color, at the same time it makes it harder to correct so I try to not overwork it. At this point I am not adding too much in the area of shadows so erasing is more for highlights in the face and hair texture. 


Not the best picture it was very late at night and I had to use the florescence. I was really motivated to draw a lot today. Every nap the kids took, and each moment of silence I got I was drawing, and coloring. The vines, and the leaves were the best part. I like treating each portion of the drawing as it's own individual drawing. I kind of zoom in on the drawing and add a flat color with out adding too many shadows in case the light source changes. I do however add just enough darkness when an object overlays another. Giving everything on this drawing will have a form of brown in the color, I decided to give it way more color by adding different color flower petals on her garden made wardrobe. 


It wasn't until today that I understood what I was going for. I saw her pose and I said to myself I want to show a motherly fairy gift that made her unique. What more motherly than caring for something that is not well or dying. This actually gave me an idea for an entire series. I plan on having each fairy help out around the house. In this case reviving the dying flowers left neglected on the tabletop. I colored the flowers that were dying very dark, and dried up, but the sunflower bright and open. I picked a sunflower because it was a good opposite to the color of the petals used on her skirt. That way it draws your eye into the line of action along with her hand. Tricky right. 


Well having a new smart phone comes with advantages and can make you feel like a dummy. Apparently there is a setting for Florescent lights to take pictures indoors. At least now you can see all the colors in the image. It was finally time to add the wings and get going on the background. Now have you ever worked on a piece for several days, and then make a really dumb mistake towards the end. Well yeah that happened. As I was working on the wings, I grabbed a graphite 6B soft pencil instead of the black for the details on the wings. After I finished the first wing I couldn't understand why it was smudging and mixing with the other colors. Well needless to say it made the wings very dark and over shadowed the entire picture and did not match at all. So what do I do at this point give up? Heck no! I make it work to my advantage. Rather than jump into the background, after the wings were finished, I Used the same graphite pencil for the shading on the rest of the drawing. It took some time away from finishing the drawing, but using it gave the entire drawing it's own style. Not only that it gave me an idea for the background. 


Originally for the background I had the idea of light coming into a window as rays across the paper, but then I figured it would make the viewer dizzy going left to right then down to up. Nah. Instead I wanted the light source to come from the flower itself. Almost like the Sunflower is thanking her for re-hydrating it with fairy magic. I needed more violet so that was my background color along with black and blue. Then I used that graphite pencil to give each ray of magic a shadow effect blending it through the yellow which was the accidently inspired part. I'll be honest if I hadn't used that pencil the drawing would have been lighter, and the background probably not so magical. In the end I was very happy with the results. And It is ready for sale on my website. 
It was a journey with this piece. It was fun to create a new character, and have a little mistake turn into a big payout. Goes to show you don't toss it out, just adjust it. There is erasers for a reason. Especially in work. Thank you for stopping by. 

I am available for commissions this holiday season. If you have an idea for a gift feel free to contact me today on my website. If you can dream it, I can draw it.

Derrick Rathgeber - Derrick the Artist

Tuesday, November 12, 2013

Superman Returns, I am Back

I have been away for a while, and it feels like it has been far too long. It pains me to say this but I got overwhelmed, and crushed with the weight of always trying to be on top of everything. Moving moving moving, I was always moving. Moving to get income again, flying to make sure the kids had everything they needed for home and school, Running to get some drawings in, and Fighting to push trough this pain of old and new injuries to be healthy again. I thought I was invincible, and I could keep going, but you could say I found my limits, and had to push some things aside and refocus my life.

After a long year of fighting I was finally recieving my Permenant Disability pay. For an entire year we were living off scraps, my kids missed birthdays, holidays, and so much more. My wife and I hadn't gone on a real date in all that time, and as far as profession in the art industry how could I compete when I couldn't even buy a photo copy of my artwork to sell. I did feel good that in that time I did reach a wide audiance and gained a lot of respect having not spent a dime, but I did find out the harsh truth. If you don't have money to invest in your self, you are not going to sell. You can share all you want with the power of social media, but unfortunatly with the changes in internet marketing every form of advertisment costs money. I did all the techniques you would do aside from buying ads, and I had a lot of success, but not enough to make a career out of it. But now that all changes. Now I have a small budget to buy business cards, prints, and online ads. I can even make my website ad free. It feels good to know that it won't happen right away, but with all I have learned over this year, I can now implement that with a strong plan, and you will get to see a whole lot more coming from my website, this blog, and every social media page I own.

It's funny how something so simple can change your life for the better. Not just for my artwork, but everything changed. I could actually feel myself getting stronger and healthier with the weight and stress being lifted off of my broken back. I am no longer walking with a cane any more, and my energy levels are the highest I remember since the accident. I have been able to walk the kids to and from school each day, and excercise lightly again. Even my wrist doesn't bother me as much. I drew two hours the other day without any issues. That hasn't happened as long as I can remember. I tell you one thing my kids, and wife noticed it before I did. I thought I was doing what I usually do and push trough it. I feel like the kryptoninte is finally being expelled from my body. I can be Superman again.

Superman is who I will always be. I was born to be him, and to my family I am him. I forgot that along the way somewhere and had to be reminded. A funny story that happened on Halloween. I walked my kids to school for their costume parade, and my kids were in costume, but I was wearing my Superman shirt, and jeans. One of my daughter's friends asked me if I was going as Superman this Halloween and I said no, (I was a Swat Police Officer this year,) Then my daughter made my my day by saying why would he dress up like Superman for Halloween, he is Superman everyday. Talk about choking me up a bit right. I think she was trying to get a bonus on her allowence...Which she did. ha ha. But what this really meant to me was how much my kids believed in me. The wanted me to prove to them that there was no giving up, and being stronger than your situation is what makes a hero. I didn't have to leap buildings in a single bound, I only had to leap hurdles. I didn't have to be more powerful than a locomotive, I just had to show them I was more powerful than my injuries. I didn't have to move faster than a speeding bullet, all they ever wanted was me to slow down and take my time enjoying life with them. So I did. I slowed down, and the rest took care of itself.  I was able to listen, learn and better myself.

Sometimes it's good to just fly up above the Earth and just drift in space quietly listening to the world.Just get away and relax until it's your time. It wasn't my time yet and I got discouraged. I let the world place it's weight on me, but now I choose to fly above it and make things happen.

So in the next coming months a whole lot is going to happen. New is the theme. New art, new comics, new lessons. All of it will be new. I will even add some new contests just to make things more fun, and interactive. So I hope you join me as I grow. I would like to see a lot of you grow with me.
I made a list of all my social media sites if you want to link up, and share your art, and talents with the world. Check out the image below.


Thank you for reading,

Derrick
http://derrickr.webs.com

Thursday, August 29, 2013

Featured Art - Angel of Death by Derrick Rathgeber (DerricktheArtist)

Angel of Death

Medium: Colored Pencils/ Bristol Smooth 11" x 14"

Original Price: $400.00 -  Click Here to Buy Now. 

This purchase qualifies for 60 days same as cash financing with PayPal.  

Prints are Available:

 
Angel of Death is a tragic illustration of the original poem by my wife. This 11 x 14 colored pencil drawing shows the dancing of death in the pale moonlight in visual that I can't begin to describe as she did in her poetry. The poem Angel of Death by Patricia Rathgeber can be found on her blog page.

http://snsaintalwaysnice.tumblr.com/post/51843925243/angel-of-death-by-patricia-rathgeber-come-dance

Own the original today.

Sunday, July 21, 2013

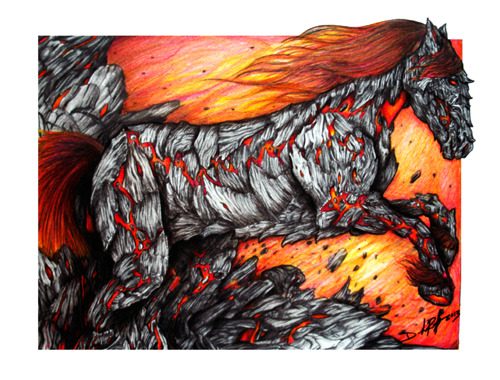
Featured Art: Hraunkot by Derrick Rathgeber

Featured Art: Hraunkot 
by Derrick Rathgeber

Title: Hraunkot

Medium: RoseArt Colored Pencils/ Bristol Smooth 11" x 14"

Original Price: $200.00


Hraunkot - A good name for a strong Horse bursting from Lava, and jumping right off of the page. In this colored pencil drawing I wanted to illustrate strength, power, and beauty with the stroke of a pencil. I formed rock texture, and the fire using different techniques, and patience with each part.


Tuesday, July 16, 2013

Break the Chains That Bind Your Artwork

Breaking boundaries and becoming more creative than you ever thought you could be. That is what today’s blog is all about. I’ll be the first to admit that I changed my entire drawing style to build myself as a professional artist. I honestly felt no one would take me seriously if I kept drawing characters, and creations out of my mind. I tried, I really did. I would post my work online and got nothing back in return. Was this because I wasn’t good enough, or people didn’t like what I had drawn? Now that I look back on it I don’t think so. I think it was because I didn’t believe in myself enough. I held back in a lot of my work and it suffered dramatically. I would spend hours creating a lot of detail in the beginning, and then just tire of the drawing because it wasn’t me. It just didn’t represent me as an artist.

I have felt really chained down as an artist these past few months and as I was looking up a reference shot for my next piece I asked myself why? This picture I am about to draw has already been captured on photograph it’s done. What about all the great pictures in my mind that are trapped in there. I literally had thousands of images screaming to be released onto paper, and I was scared that I would mess them up. There is pressure to create; I always wanted to be original and draw different than everyone else. Even when I would draw from reference I wanted to find a way to change the image, but I really felt bound to make the image look like what I was drawing just because. I know it’s not a good reason but the pressure to be great, and build a portfolio got me thinking I had to make everything believable and real. And then it hit me just the other day why can’t I have the best of both, and make the imagination real and believable.

I found myself with a dilemma. Do I continue to build my portfolio with realistic colored pencil drawings or do I draw for fun. In the end I answered with my gut feeling to do it for me. So my next piece is called Beyond Imagination. At first I started to collect pictures of things I would add to my work I thought to myself that I am doing it again. I was already judging myself, and holding back by using images as a crutch. If I really wanted to release my talent I had to just draw. So in this image I am drawing it from left to right adding all the detail as I go. I started with a dragon, and a witch, and a phoenix. I have no idea what is next, and I don’t care if it makes sense. It’s imagination and fun. I hope you can do the same.

I propose a challenge to everyone. On your next piece, if you want to find out how much you have evolved as an artist, I want you to use everything you have learned to this point and just draw. Lay it all out on the paper. Don’t think about judgment from peers, or from yourself just go. Whatever comes into your mind go for it. The only other rule I ask for is to not use reference shots, photos, or any previous artwork. Make it yours, make it new, and take your time. Sometimes when you hit the professional level you get a following who love your “style.” If so fantastic don’t change. For me although I have gained a lot of praise for my work, it’s time for me to take a step back for a while and brake the chains that bound my imagination. I plan on growing, and releasing all I have to give, I hope you do too. Take the limiters off, and be creative again.

I hope to see some great new creations. Find me on my Facebook page at http://Facebook.com/DerrickRathgeber and share them with me.

Thank you for reading,

Remember to Share, Comment, and Subscribe.

Derrick Rathgeber


Saturday, July 6, 2013

How to Color a Daisy With Colored Pencils by Derrick Rathgeber


How to Color a Daisy With Colored Pencils
By Derrick Bruno

Thank you for your Donation & Support!


https://www.pinterest.com/pin/60869032437031919/

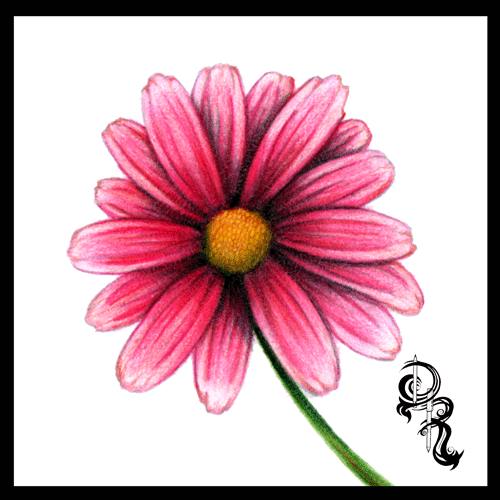
Welcome to the next lesson in colored pencil drawing. In the last lesson we learned how to layer different colors to create a solid multi-colored pink lady apple. In this lesson I will teach you how to train your brain to see your drawing as different individual pieces. The perfect way to do this is with the daisy. We will focus more on directional shading and coloring in this lesson, and how to obtain textures using different strokes.

Grab your box of Colored Pencils out and grab the following colors; Pale pink, Pink, Cerise, Ruby, Light Brown, Golden Yellow, Grass Green, Black, and White. These will be the 9 colors we will be using for this lesson.

Tip: If you would like to change the color of your flower, you may substitute the petal colors (Pale Pink, Pink, Cerise, & Ruby) to another four colors. Just make sure you go from light to dark. For example a purple flower you could use Light Lavender, Lavender, Purple, & Orchid. 

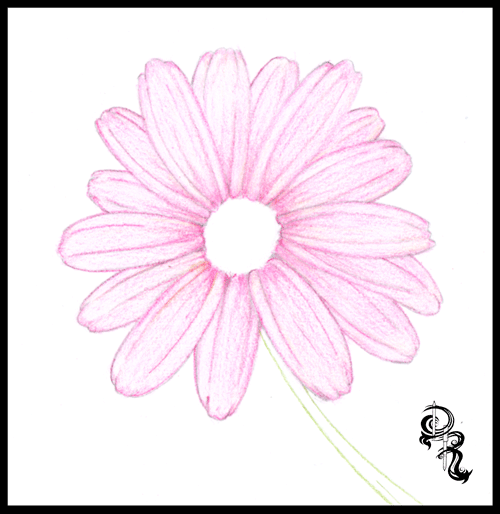
Step 1: Lightly draw your daisy using faint strokes of a pencil, or light grey colored pencil. Start with the circle in the middle of the flower. Follow that with about six individual petals all roughly the same length, but different characteristics. If you note each petal has two fold lines going down the, and the ends are jagged. Behind these petals you will draw more petals. Continue layering your petals until you are satisfied with the shape of your daisy. Now use the Grass Green colored pencil and draw two curved lines for the stem.

Tip: If you would like to skip ahead and focus on the coloring lesson. You may download the sketched out image seen below. Click the link Below.


Step 2: We are going to put down the base color for the flower. Take the Pale Pink Colored Pencil and start coloring in each petal. Now to do this we are going to use a fun technique. The reason I chose a daisy is because it’s a circle shape. You will want to color in the direction of each petal; to do this can get frustrating because you have to contort your hand into uncomfortable positions. So what we are going to do is keep our hand in the same position and rotate the paper. Use light gentle strokes across each petal evenly, and use more pressure on the lines, and towards the center of the flower. Continue rotating the paper and coloring each petal until they are covered.


Step 3: Practice Makes Perfect. Find a petal to start with, and start adding the next layer of color. Using the Pink we will start off at the base of the petal and color in the direction of the petal. Color only the base of the petal and the center area of the petal. Again rotate the paper as you go and color in a position that is most comfortable for you and your wrist. This will allow smoother lines and more control.


Tip: Treat each petal as a new drawing. Taking your time and giving attention to each one will allow your brain to see shapes that you would otherwise over look. Remember to draw comfortably, take breaks when you need them, and just have fun.

Step 4: Using the Cerise you will continue adding more color and depth to the flower. We are going to start adding some shadows and curves to the petals. Color from the base of the petal with more pressure and lighten your strokes as you reach the end of the petal. Define the shadows for the petals underneath by using darker strokes where the top petals overlay.


Step 5: We are going to fine tune the shadow by adding one more red color. Using the Ruby Colored Pencil we will once again add more depth the flower petals. Rotating the paper as you go of course, sharpen your lines toward the base of each petal around the circle. Then define the lines of each petal using the Ruby color. Now as you rotate the paper use back and forth strokes to really get the dark Ruby color to make an even shadow on each petal towards the center of the flower to make it look like the petals fold inward.
Step 6: Now we are going to get into the middle of this flower. Don’t worry no more rotating the paper for this one, unless you want to of course. This part is actually kind of fun for me. Making a realistic pollen look is easier than it looks. Using the Light Brown find the center of your circle and make a much smaller circle. This will be your starting point. Now continue making small circles around this circle, and continue until the center is full. Once you get to the edge of the petals, use the Light Brown to fill in any gaps between the flower center and the petals. Now add some of this brown to the stem with some lines dark lines, and we will move on to the next step.


Step 7: Now it’s time to add some color to the center. Using the Golden Yellow make even circular strokes to fill in the center area. Continue going over it until you get a nice even color. Once you are finished use the same Golden Yellow color and very lightly go over the base of each petal. We do this because light reflects colors onto nearby objects. Sometimes it’s not noticeable, but just enough will make your drawing look that much more realistic. Then to finish off this step add some more light stroke lines onto the stem to give it an earthy browning like color when we go over it with the green.


Step 8: Probably the easiest step of the drawing. Take the Grass Green color, and color the entire stem. Be sure to color right over the Golden Yellow and Light Brown colors. Remember to color along with the shape of the stem in the same direction. You can even rotate the paper to give you a comfortable position and clean lines. Color the area by the flower darker show the shadow of the flower covering the stem.

Tip: By now I hope rotating the paper comes to you as a reflex. This will help you draw strait lines and curves, and can be used to draw all sorts of shapes and objects. Draw smarter not harder.


Step 9: Now to cast the final shadows. Use the Black Colored Pencil and outline the base of each petal and the flower center. Next begin shading the top petals lightly just enough to show that they curve inwards towards the center. Add some more black color to the petals underneath using the top petals as a guide. Next tilt the black pencil to the side a bit, and give a shadow to the center of the flower. Use crosshatching strokes towards the bottom of the circle to make it look like a sphere. Finally cast the shadow on the top, and down the side of the stem to finish up the shadows.
Step 10: To finish up our flower take the White Colored Pencil and color the edge of each petal. Next blend together the light and the dark colors by coloring from the edge of the petal down to the middle of each petal. This will even out your colors, and help cast light onto your drawing. Next add white to the cent of your drawing, and to the stem. And there you have it a beautiful flower.


Tip: Find your light source. Sometimes when I draw I will cast a light over my drawing and see which way the paper casts a shadow. Use this as a guide for your shading.

That does it for this lesson. I would love to see your work. Send it to us and we would be glad to share your results on my Facebook page at http://Facebook.com/HalfEvilProductions

Tuesday, June 25, 2013

Twisted Fate: Show Off by Derrick Rathgeber

Twisted Fate: Show Off
by Derrick Rathgeber
Twisted Fate: Show Off by Derrick Rathgeber
Our Fate decides to create an elaborate pulley system with the threads of life. This can’t be good…Awesome maybe.
Visit the Twisted Fate comic strip series on Pinterest at http://pinterest.com/derrickr333/twisted-fate-by-derrick-rathgeber-comic-strips/
Be sure to find me on Facebook for more fun and great arthttp://Facebook.com/DerrickRathgeber
Thanks again, 
Derrick Rathgeber

Tuesday, June 18, 2013

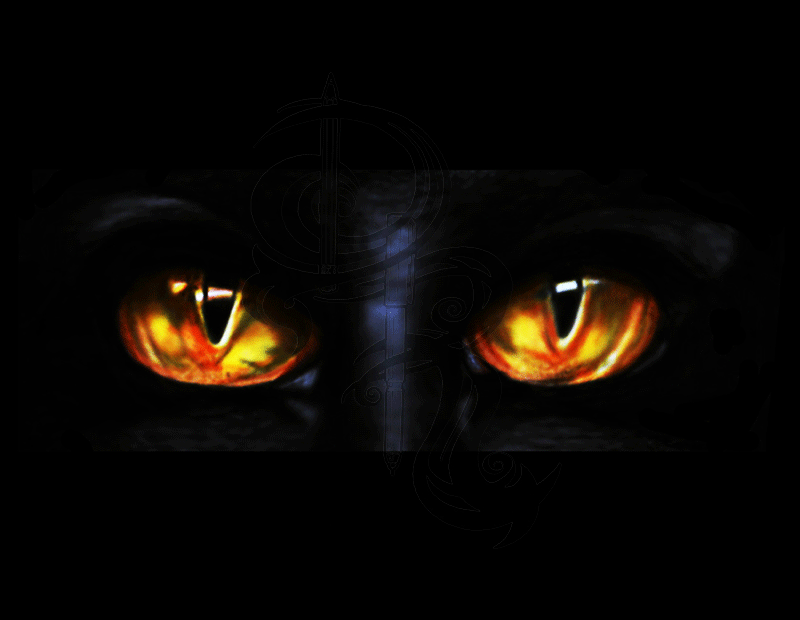
Featured Art: MezmerEyes by Derrick Rathgeber

Featured Art: MezmerEyes
By: Derrick Rathgeber


MezmerEyes is an illustration I drew in my sketchbook in 2011. This piece I can honestly say is one of those drawings that stick with you. It makes you form questions in your head like what is it, and what is it thinking as you stare into it's eyes. I drew these eyes originally going for a cat eye, but as I drew it I noticed that I gave it some human like features like the nose and faint eyebrows. I was mostly playing with the grey and black colors. The actual eyes I was going for was a nice glowing yellow with a small hint of gloss. 

I am proud to say that this was the first drawing that I did post accident that sold a print. It was in a church auction, and I listed the base price at $10. It got a few bids and sold for much more, and the buyer insisted that I sign the piece, as she had faith that I would be big one day. I was of course humbled and didn't think anything of it, but she was pretty serious, and was extremely happy that I signed it for her. I kind of felt like a celebrity for the moment. Kind of cool. 

This drawing is still available for prints, with great framing options from FineArtAmerica.com along with all of my showpieces. Some originals are available as listed. Feel free to view my profile on there and own one that sticks out to you, as low as $40.00! 

You can even purchase right off of my Facebook site at https://www.facebook.com/DerrickRathgeber/app_309028460694

Thank you for all your support, and enjoy the art. 
Derrick Rathgeber


In Feed AD