Showing posts with label roseart. Show all posts

Thursday, March 13, 2014

How to Draw a Rose with Colored Pencils

 by Derrick Bruno

Http://HalfEvil333.com

Support & Donate by clicking the button below.
Thank you Very Much.


In this lesson I will be teaching you how to create a lovely red rose using some different techniques. We will focus on using colors to add depth and layers into your work to give your artwork that look that has them coming off the page. Another focus we will work on is overlaying colors, and texture shading. I use RoseArt pencils and the colors listed below are what I used for this lesson.

Tip: If you do not have the colors listed below it is okay. You can use 3 shades of red from light to dark, 1 pink, one green, a sienna/yellow color, a brown, and a Black for shadows. 

·         Black
·         Brown
·         Sienna
·         True Green
·         Ruby
·         Cherry Red
·         Red
·         Blush Pink


Drawing the Rose:  We are going to start by lightly sketching out our rose. I like to start at the middle of the flower using spiral curves. As I build the middle I like to braid each side left to right. When I get closer to the edge each petal grows a bit larger. Keep the basic shape of the rose, and use references as needed. Have fun with the stem and add the leaves. I like to have the leaves jagged with curved tips. It gives them character and makes the drawing fun. Remember not to focus on a lot of detail for the sketch and draw lightly. We are going to use this lesson to add details by coloring with the pencils.


Step 1: To start bringing this lovely flower to life we are going to use the Brown first. Lightly shade each area of the rose on the outer edges of each layer. Once you get to the outer layers you are going to shift the direction of your shading to follow the curves of the petals. When you get to the outer larger petals you are going to give them their shaped edges, and details. Start from the edges and draw dark lines where the petals buckle a bit, then starting from one side of the petal and shade from side to side with the curve of the flower towards the center.


Step 2: Next we will define the rose by adding the lightest color. Using the Blush Pink (Pink) We are going to add a layer of pink to the inner area of each petal. You can shade with the curve of the lines from dark to light. We really want the pink to show through because this will help define the shape of the rose and keep the details from getting lost in the layers of red on top of red.
Tip: Keep the pink out because we will use it towards the end to define the highlights & tones.


Step 3: This is the step where you are going to get into the picture. We are ready to add our first touch of red, or in this case Ruby (Darker Red). Start coloring over the brown towards the middle of the flower using medium pressure. If you look at the picture you will also notice that you will want to fill in the corners of the petals and shade from dark to light towards the middle of each petal. By this time you will start to see the flower bloom outward.


Step 4: In this step we are going to fill in the rose with a nice even texture. This is one of two layers on the rose petals that will fill in the vibrant colors. Using the Cherry Red (Medium Red) you are going to use nice even back and forth strokes along the petals. Try to make the lines have some spacing and sketchy this will be filled in with the last shade of red. By keeping them sketchy and the same direction with the flower, you will give the flower a nice texture with little effort. It’s a fun trick, and another reason I love colored pencils.


Step 5: This is one of the shorter steps. We are going to fill in the white area in between the petals with a flat color. Grab the Brown, & Ruby colors and fill in this area. Use as much pressure as you feel comfortable with, but fill it in clean and even using both colors. And with that we move on. I told you it would be pretty quick.
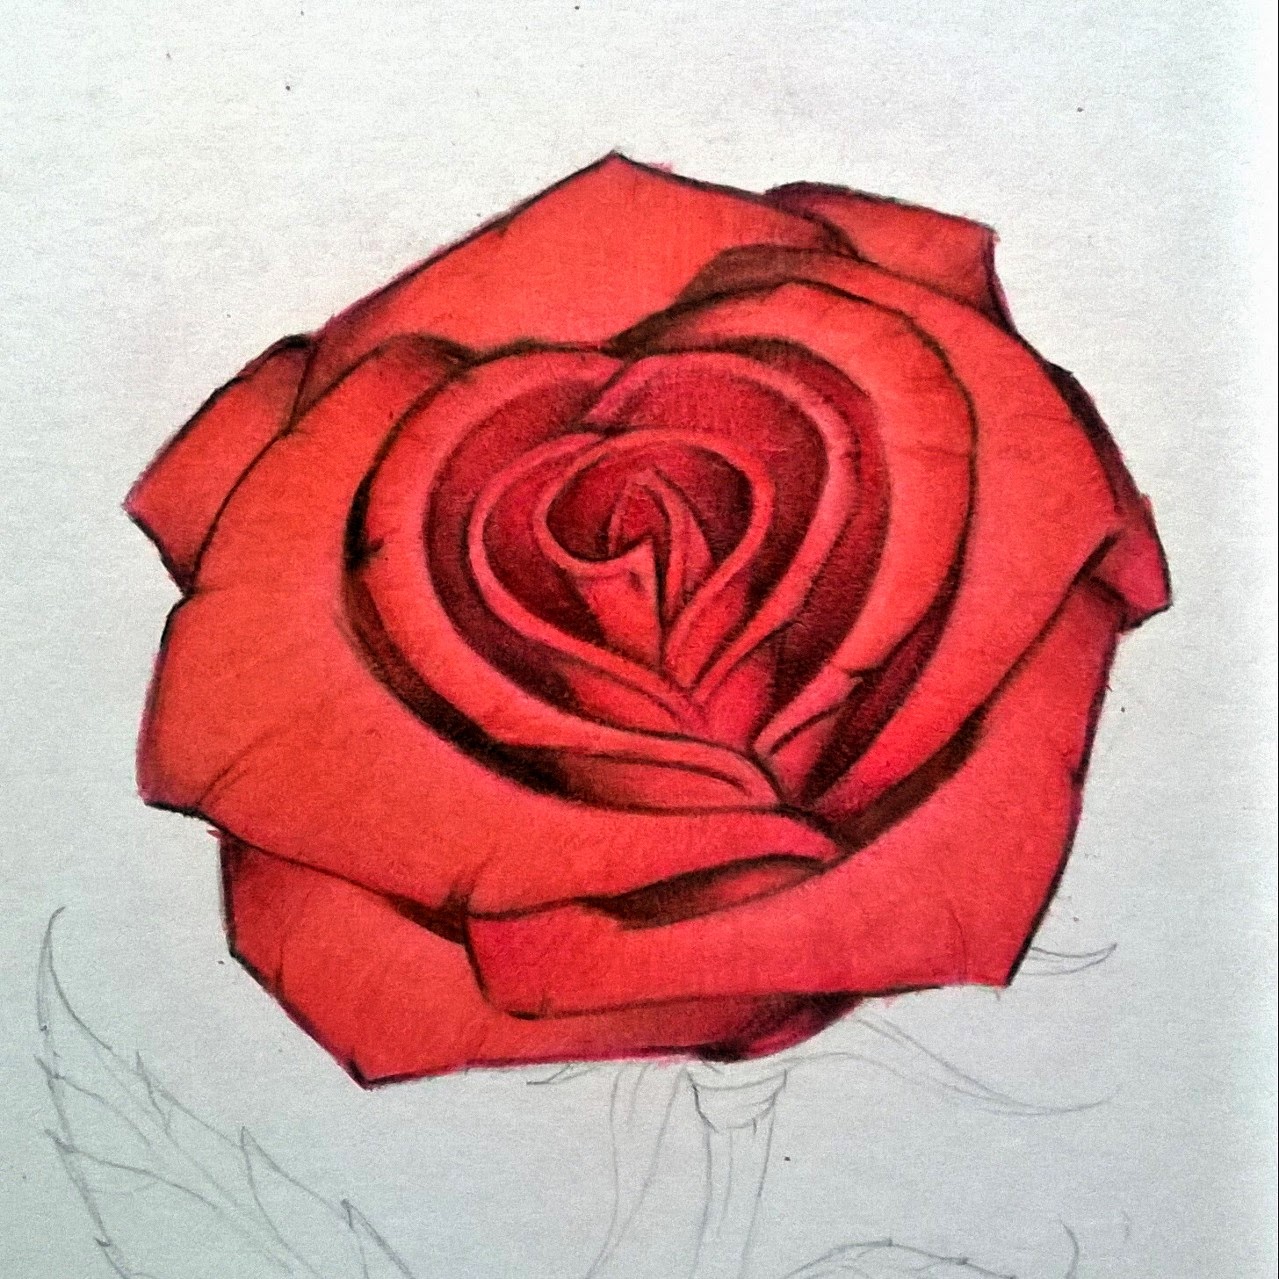

Step 6: We are now going to define the shadows with this step and give our rose a nice clean look. Using the Red Pencil go over the entire flower. Remember to color in the same directions as the other steps. This will fill in any gaps and make the petals solid. Now you will use the Blush Pink and define the highlights around the center of the petals. Now use the Black pencil and begin to really define our Rose. Color nice clean lines along the curves of the inner rose petals as shown in the image above. Start from the center of the rose shade from dark to light on each area. As you move down the flower start shading from petal to petal starting at the sides and shade towards the center. As each petal over laps that is where you will add the shadows from one petal to the other. This will give you a nice layered 3d look. And with that we will begin on the stem and leaves.


Step 7: Using the Brown you will define the lines in the stem. Start with the border, and move inward making wood like lines up and down the stem following the curves. With the leaves you will sketch lines from the center of the leaves to the middle. Make them very sketchy and sparse. We will color over these as we did with the rose petals.


Step 8: In this step we are going to repeat but add to the Brown color to create more of a realistic stem. Using the Sienna (Yellow/Tan) add some more lines up and down the stem, and fill in some areas. With the leaves you will lightly shade from the center to the edges in a back and forth sketchy motion. Don’t fill in the entire leaf with this color you want to leave gaps. Remember you want the color to show through, but not become the dominant color of the stem. What this will do is add layers and make the flower come off the page.


Step 9: Now to make the Flower look young and alive let’s make the stem green. Using the True Green (Green) color the stem from top to bottom with small even strokes. You want to fill in the gaps and color over the other two colors. You will notice how the colors blend together at this point and see your green become a nice blend of earthy colors.


Step 10: Here we are at the final step of our lovely red rose. Using the Black add your final shadows on the stem. Start at the top where the flower petals overlap the stem and leaves. As you go down shade on the left side, and the top of the leaves moving from dark to light. Finally at the bottom add black and move upwards showing the cut stem’s edges. Remember to use your best judgment on the shadows and highlights of your rose. What I like to do is have a light next to me and see how the shadows fall on the page. You can even go one step further and cast a shadow onto the paper from the rose. Make it your own, and have fun.

Tip: Remember the direction of your shading, combined with pressure will give you your textures. This is what you will learn as you go as you begin to develop.

This would conclude our lesson. I want to thank you for visiting and allowing me to help you grow as an artist. Remember if you have any questions feel free to email me at DerrickBruno@HalfEvil333.com, and I will answer them the best I can. I would like to see your own roses too.

Feel free to share them on your favorite Social Media Sites Using the Hash tag #HalfEvil333 I would love to see your progress and work.

Sunday, July 21, 2013

Featured Art: Hraunkot by Derrick Rathgeber

Featured Art: Hraunkot 
by Derrick Rathgeber

Title: Hraunkot

Medium: RoseArt Colored Pencils/ Bristol Smooth 11" x 14"

Original Price: $200.00


Hraunkot - A good name for a strong Horse bursting from Lava, and jumping right off of the page. In this colored pencil drawing I wanted to illustrate strength, power, and beauty with the stroke of a pencil. I formed rock texture, and the fire using different techniques, and patience with each part.


Wednesday, June 5, 2013

How to Draw Glass with Colored Pencils: Erasing to Add Detail

How to Draw Glass with Colored Pencils: Erasing to Add Detail  
by Derrick Rathgeber

Thank you for visiting. In this lesson I will teach you how to draw a believable glass texture. Our subject will be a light bulb so we will be using grey colors for this lesson. You’ll even have a small bonus lesson for the metal texture at the base of the bulb. What you will be learning today is how to use your pencils to color smoothly, and how to take away from your drawing to add more depth and detail. Are you ready to get started?

First off the colors I chose for this lesson are as follows: Grey, Cool Grey, Dark Grey, Black and White.  Also we will be using an eraser. Preferable a white one, or gum eraser.


 Step 1: Using the Dark Grey draw out your light bulb. You can opt out the details in the middle if you like they are not necessary for this lesson. You do however want to get the bulb shape, and screw at the base. This lesson is more about coloring and texture than copying the image.

Hint: Any time you are drawing from a reference a good fun trick to do is draw the image upside down. It sounds funny but it tricks your brain into drawing what you see, and not what your brain knows.


Step 2: Using the Grey colored pencil you will fill in the lower area of the bulb using medium pressure. Once completed take your pencil and hold it at a slant so the point is flat against the paper. Lightly begin to shade in the rounded bulb area using rounded strokes back and forth. This will give you a smoother fill. Continue to crosshatch and fill in the top of the bulb, and the base of the bulb until you get a good smooth cover.

Hint: Practice, and do not rush. Remember you’re not in a race, and you won’t get a prize for finishing first. This is a technique that you are trying to learn. Take scratch paper and use the side of your pencil lead to make strokes of different lengths, and pressures.


Step 3: Here is where it gets fun. Find a good size eraser, preferably a gum eraser, or white art eraser. Now you can look at a light bulb for reference or visualize where you will see the shines. You can also use mine for reference. Start erasing away where you want to have the shines. Be sure to follow the shape of the bulb, and do not be afraid to erase the details of the center, that just gives it more character. This gives the illusion of a rounded shape that you can now view start viewing as glass.

Hint: We used grey in this lesson because our background is white. This is only to make the 2D object appear three dimensional. Now if you have the bulb in front of an object or let’s say a yellow wall, you would color the bulb the same color as the background, or slightly lighter color of the background depending on how thick you want the glass to appear.


Step 4: Now we have to make the glass shine more prominent. You can now use the Dark Grey color and start shading around the shines. We are going to add more pressure at the top of the bulb, the base of the glass, and around the erased shines. Be sure to blend the Dark Grey and Grey together by adding layers of color from dark to light. Also if you added the middle detail you will use the Dark Grey to define the glass on the inside as shown.


Step 5: In this step we are starting on the metal base. Simply use the Dark Grey again and fill in the areas as shown. It’s okay to make these areas dark as we are going to add black to it later. You want to show the light bending around the metal object. And this object is smooth.

Hint: When you draw metal objects be sure to pay attention to your light sources, and remember that light comes from behind too, as seen here.


Step 6: Using the Cool Grey color begin shading the base filling in the left side darker, and leaving the right side lighter. This shows where your light source is and keeps the color flowing across the object. You can even color up and down the screw base to ensure you get the same dark to light scale going from left to right. And remember this metal is also smooth so it’s a great way to practice your small smooth strokes.

Hint:  A good tool to help you blend your pencil drawing is a “Blinding stump.” They are highly affordable, and easy to use. If not you can always use your fingers to smudge the colors together. I did before I know they existed.


Part 7: To add our finishing touches on this piece we are going to just define the light bulb, and highlight the shines. So let’s start off by grabbing the Black pencil. Start by outlining the bulb, and shading in areas of the bulb close to the base and around the top. Take a step back and look at your image and you can see where the shadows are coming from. Those are the areas you want to darken.  Next you will use the Black to also darken the shadows on the metal base to really make the metal shine, and stand out from the glass. You can also add a layer of shading to make it darker from the glass bulb.

Finally we are going to use the White pencil to color over the middle of the glass and shines to really make the center pop. Almost like the light is starting to light up. And to finish the drawing off add white to the right side of the metal base, and around the sides to show where the light is coming from.

I hope you enjoyed this lesson. Please email any comments or suggestions to DerricktheArtist@Live.com. Find my new portfolio page at http://Derricktheartist.com. 

I would like to see your work. In fact if you share your results here on my Art Facebook page - HERE -, I will randomly select someone to give the original signed copy to. FREE of charge. I hope to see some of your work. (Feel free to add to it if you have any "bright ideas." 

Again thank you for allowing me to share these tips and tricks with you, and if you have something you would like to learn feel free to suggest it to me anytime. Have a great day!


Tuesday, May 14, 2013

Featured Art - The Flight of the Macaw


Flight of the Macaw - This one of a kind piece pushes colored pencils to the limit. Over 40 different Rose Art colored pencils went into this piece.

This piece is currently showing live in the Riverside, CA Artscape Gallery.

Visit the Artscape Gallery in
The Riverside County Administration Center
located at 4080 Lemon Street, Riverside, CA 92501

The Original is Available for Purchase

To purchase the original contact Rachael Dzikonski via email at: rachael@riversideartscouncil.com

Dimensions: 18.000″ x 24.000″
Medium: Colored Pencils

In Feed AD