Showing posts with label flower art. Show all posts

Sunday, November 24, 2013

New Artwork - Rebirthing by Derrick Rathgeber

Title: Rebirthing
Medium: RoseArt Colored Pencils/ Bristol Soft White 11" x 14"

As I was going through a lot of my old drawings from years ago, I came across a fairy picture I drew. It was a large one using both markers and colored pencils. After going over it I was instantly inspired to do a new fairy picture. It had to be completely new and show how much I have changed as a designer and artist. To me it not only had to work, but show some sort of action with lots of colors. 


So where do I go to get some ideas? Not the drawing board, but the sketchbook. When I have an Idea one of two things happen. A whole lot of very messy broken sketches, or a drawing that just stands on it's own. This time I just nailed the look I was going for. I wanted a fun pixie type fairy that lived in the forest, or garden. She had to look like she lived outside, and used materials that she found to dress herself. So for her clothing I used grass, small twigs, string, flower petals, and leaves. I didn't color this one because I wanted to get to the scene I wanted to portray, and I didn't want to draw another fairy just sitting down either. With my basic design and idea ready it was time to start drawing my new piece. 


My new fairy was gaining a life of her own. As I drew her out a lot of things changed, which usually happens when I start new drawings. In fact in this drawing the entire concept changed about three times. I made her more of a motherly yet youthful looking fairy, and taller. Having done this I wanted to show why so I have her flying in mid air raising her hand up in a strong tall pose. This is my favorite part of drawing. It's letting go and drawing a new character design from nothing. You create personalities and life on the paper. I will say one thing though I do go through a whole lot of erasing. 


I already knew that I wanted to do more of an earthy tone to this piece. To do this I used a whole lot of brown, and dark browns instead of black for shadows. At the same time I still wanted to have her very colorful and vibrant. I used about three greens just for the small leaves alone, on top of the burnt sienna, and brown. Using colors over colors gives you the bright colors that you would never see using just one color, at the same time it makes it harder to correct so I try to not overwork it. At this point I am not adding too much in the area of shadows so erasing is more for highlights in the face and hair texture. 


Not the best picture it was very late at night and I had to use the florescence. I was really motivated to draw a lot today. Every nap the kids took, and each moment of silence I got I was drawing, and coloring. The vines, and the leaves were the best part. I like treating each portion of the drawing as it's own individual drawing. I kind of zoom in on the drawing and add a flat color with out adding too many shadows in case the light source changes. I do however add just enough darkness when an object overlays another. Giving everything on this drawing will have a form of brown in the color, I decided to give it way more color by adding different color flower petals on her garden made wardrobe. 


It wasn't until today that I understood what I was going for. I saw her pose and I said to myself I want to show a motherly fairy gift that made her unique. What more motherly than caring for something that is not well or dying. This actually gave me an idea for an entire series. I plan on having each fairy help out around the house. In this case reviving the dying flowers left neglected on the tabletop. I colored the flowers that were dying very dark, and dried up, but the sunflower bright and open. I picked a sunflower because it was a good opposite to the color of the petals used on her skirt. That way it draws your eye into the line of action along with her hand. Tricky right. 


Well having a new smart phone comes with advantages and can make you feel like a dummy. Apparently there is a setting for Florescent lights to take pictures indoors. At least now you can see all the colors in the image. It was finally time to add the wings and get going on the background. Now have you ever worked on a piece for several days, and then make a really dumb mistake towards the end. Well yeah that happened. As I was working on the wings, I grabbed a graphite 6B soft pencil instead of the black for the details on the wings. After I finished the first wing I couldn't understand why it was smudging and mixing with the other colors. Well needless to say it made the wings very dark and over shadowed the entire picture and did not match at all. So what do I do at this point give up? Heck no! I make it work to my advantage. Rather than jump into the background, after the wings were finished, I Used the same graphite pencil for the shading on the rest of the drawing. It took some time away from finishing the drawing, but using it gave the entire drawing it's own style. Not only that it gave me an idea for the background. 


Originally for the background I had the idea of light coming into a window as rays across the paper, but then I figured it would make the viewer dizzy going left to right then down to up. Nah. Instead I wanted the light source to come from the flower itself. Almost like the Sunflower is thanking her for re-hydrating it with fairy magic. I needed more violet so that was my background color along with black and blue. Then I used that graphite pencil to give each ray of magic a shadow effect blending it through the yellow which was the accidently inspired part. I'll be honest if I hadn't used that pencil the drawing would have been lighter, and the background probably not so magical. In the end I was very happy with the results. And It is ready for sale on my website. 
It was a journey with this piece. It was fun to create a new character, and have a little mistake turn into a big payout. Goes to show you don't toss it out, just adjust it. There is erasers for a reason. Especially in work. Thank you for stopping by. 

I am available for commissions this holiday season. If you have an idea for a gift feel free to contact me today on my website. If you can dream it, I can draw it.

Derrick Rathgeber - Derrick the Artist

Wednesday, October 2, 2013

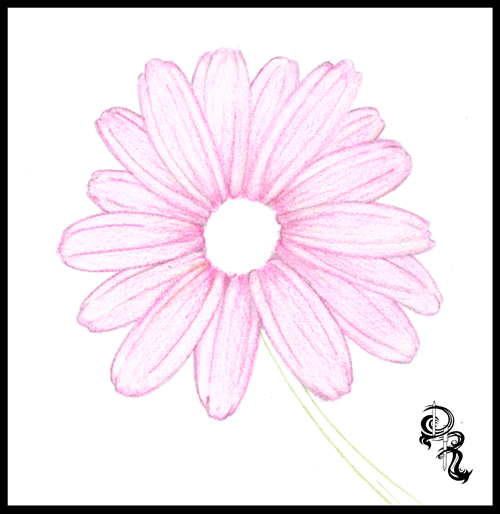
How to Color a Daisy With Colored Pencils by Derrick Rathgeber

How to Color a Daisy With Colored Pencils
By Derrick Rathgeber


Welcome to the next lesson in colored pencil drawing. In the last lesson we learned how to layer different colors to create a solid multi-colored pink lady apple. In this lesson I will teach you how to train your brain to see your drawing as different individual pieces. The perfect way to do this is with the daisy. We will focus more on directional shading and coloring in this lesson, and how to obtain textures using different strokes.

Grab your box of Colored Pencils out and grab the following colors; Pale pink, Pink, Cerise, Ruby, Light Brown, Golden Yellow, Grass Green, Black, and White. These will be the 9 colors we will be using for this lesson.

Tip: If you would like to change the color of your flower, you may substitute the petal colors (Pale Pink, Pink, Cerise, & Ruby) to another four colors. Just make sure you go from light to dark. For example a purple flower you could use Light Lavender, Lavender, Purple, & Orchid. 

Step 1: Lightly draw your daisy using faint strokes of a pencil, or light grey colored pencil. Start with the circle in the middle of the flower. Follow that with about six individual petals all roughly the same length, but different characteristics. If you note each petal has two fold lines going down the, and the ends are jagged. Behind these petals you will draw more petals. Continue layering your petals until you are satisfied with the shape of your daisy. Now use the Grass Green colored pencil and draw two curved lines for the stem.

Tip: If you would like to skip ahead and focus on the coloring lesson. You may download the sketched out image seen below. Click the link Below.


Step 2: We are going to put down the base color for the flower. Take the Pale Pink Colored Pencil and start coloring in each petal. Now to do this we are going to use a fun technique. The reason I chose a daisy is because it’s a circle shape. You will want to color in the direction of each petal; to do this can get frustrating because you have to contort your hand into uncomfortable positions. So what we are going to do is keep our hand in the same position and rotate the paper. Use light gentle strokes across each petal evenly, and use more pressure on the lines, and towards the center of the flower. Continue rotating the paper and coloring each petal until they are covered.


Step 3: Practice Makes Perfect. Find a petal to start with, and start adding the next layer of color. Using the Pink we will start off at the base of the petal and color in the direction of the petal. Color only the base of the petal and the center area of the petal. Again rotate the paper as you go and color in a position that is most comfortable for you and your wrist. This will allow smoother lines and more control.


Tip: Treat each petal as a new drawing. Taking your time and giving attention to each one will allow your brain to see shapes that you would otherwise over look. Remember to draw comfortably, take breaks when you need them, and just have fun.

Step 4: Using the Cerise you will continue adding more color and depth to the flower. We are going to start adding some shadows and curves to the petals. Color from the base of the petal with more pressure and lighten your strokes as you reach the end of the petal. Define the shadows for the petals underneath by using darker strokes where the top petals overlay.


Step 5: We are going to fine tune the shadow by adding one more red color. Using the Ruby Colored Pencil we will once again add more depth the flower petals. Rotating the paper as you go of course, sharpen your lines toward the base of each petal around the circle. Then define the lines of each petal using the Ruby color. Now as you rotate the paper use back and forth strokes to really get the dark Ruby color to make an even shadow on each petal towards the center of the flower to make it look like the petals fold inward.
Step 6: Now we are going to get into the middle of this flower. Don’t worry no more rotating the paper for this one, unless you want to of course. This part is actually kind of fun for me. Making a realistic pollen look is easier than it looks. Using the Light Brown find the center of your circle and make a much smaller circle. This will be your starting point. Now continue making small circles around this circle, and continue until the center is full. Once you get to the edge of the petals, use the Light Brown to fill in any gaps between the flower center and the petals. Now add some of this brown to the stem with some lines dark lines, and we will move on to the next step.


Step 7: Now it’s time to add some color to the center. Using the Golden Yellow make even circular strokes to fill in the center area. Continue going over it until you get a nice even color. Once you are finished use the same Golden Yellow color and very lightly go over the base of each petal. We do this because light reflects colors onto nearby objects. Sometimes it’s not noticeable, but just enough will make your drawing look that much more realistic. Then to finish off this step add some more light stroke lines onto the stem to give it an earthy browning like color when we go over it with the green.


Step 8: Probably the easiest step of the drawing. Take the Grass Green color, and color the entire stem. Be sure to color right over the Golden Yellow and Light Brown colors. Remember to color along with the shape of the stem in the same direction. You can even rotate the paper to give you a comfortable position and clean lines. Color the area by the flower darker show the shadow of the flower covering the stem.

Tip: By now I hope rotating the paper comes to you as a reflex. This will help you draw strait lines and curves, and can be used to draw all sorts of shapes and objects. Draw smarter not harder.


Step 9: Now to cast the final shadows. Use the Black Colored Pencil and outline the base of each petal and the flower center. Next begin shading the top petals lightly just enough to show that they curve inwards towards the center. Add some more black color to the petals underneath using the top petals as a guide. Next tilt the black pencil to the side a bit, and give a shadow to the center of the flower. Use crosshatching strokes towards the bottom of the circle to make it look like a sphere. Finally cast the shadow on the top, and down the side of the stem to finish up the shadows.
Step 10: To finish up our flower take the White Colored Pencil and color the edge of each petal. Next blend together the light and the dark colors by coloring from the edge of the petal down to the middle of each petal. This will even out your colors, and help cast light onto your drawing. Next add white to the cent of your drawing, and to the stem. And there you have it a beautiful flower.


Tip: Find your light source. Sometimes when I draw I will cast a light over my drawing and see which way the paper casts a shadow. Use this as a guide for your shading.

That does it for this lesson. I would love to see your work. Send it to us and we would be glad to share your results on my Facebook page at http://Facebook.com/DerricktheArtist

Be sure to come back here for more lessons. If you would like to ask a question or make a suggestion for a drawing lesson email me at http://Derricktheartist.com.

Thank you for coming.
Derrick Rathgeber

Tuesday, September 10, 2013

Bird in Bloom by Derrick Rathgeber

Featured Art - Bird in Bloom: Never Give up 

by Derrick Rathgeber
Title: Bird in Bloom
Artist: Derrick Rathgeber - Derrick the Artist
Medium: Colored Pencils/ 22 x 28 Poster Board Soft White
Buy the Original: $800.00
Prints available starting at $40.00
http://pixels.com/featured/bird-in-bloom-derrick-rathgeber.html

Bird in Bloom this piece is so nostalgic to me as an artist. I think it means more to me that most of my art pieces, and for good reason. I went from a very dark place to a new brighter future with this one picture. 

Back in 2008 I was in a severe accident on the job, as a cable technician, that left me completely disabled. I was crushed by a faulty ladder and my entire body was bent backwards like an accordion and what was worse was the 150lb 14ft extension ladder landed on my right wrist. My chances of ever drawing again were not looking good at all. What made things worse was the fact that my injury was on the job. The insurance company never took my injuries seriously, and to this day they are still refusing treatments. 

In 2009 I continued to work on these injuries due to the insurance companies doctor. Although my treating physician placed me on full disability the insurance company sent me to a "wrist" specialist. This doctor examined only my wrist and hand, and not the rest of the injuries which included my back, lumbar spine, hips, shoulder, neck, and so on. Based on his report my work limitations were decreased and I was sent back into the field. I continued to take it easy and do only disconnects, and simple installs for a while. Until May 1st 2009, my co-worker called in sick. It was his week on call, and they had me take over his work load despite my limitations. I argued, but they threatened terminating me, and I had a family to think about. I really wished I listened to my gut. That day I pushed myself too far. I did two line drops, a trench, full house install, and multiple line repairs. I worked from 8:00am - 8:00pm with no breaks. In Blythe the weather that day was 110 degrees. Needless to say I just went home and passed out for the night. 

May 2nd 2009, Probably the scariest day of our families lives. I woke up from the day before completely drained and exhausted. I was constantly dizzy and couldn't focus. I felt really sore so I tried to do some yoga to stretch out a bit. I put the DVD in and did about half of the warm-up but that was too much. I told my wife that I was just not feeling well and went back to sleep. She watched the kids, and I went to lay back down. I woke up again around the evening time and went to the rest room. Sorry if this is a bit graphic but I peed what looked like Coca Cola. It was black. By the time I was able to look what happened I was already blacking out. My kidneys were failing. My wife got me to Palo Verde Hospital and they were a bunch of retards. They made me get out of my wheelchair, and walk. Took their time to get me a room. And when the blood results came back they thought it was an error, and almost sent me home with Gatorade. You see with all the injuries I had and me working myself to death the day before in the heat I got Rhabdomyolysis - (the breakdown of muscle fibers that leads to the release of muscle fiber contents (myoglobin) into the bloodstream. Myoglobin is harmful to the kidney and often causes kidney damage.) 
My CK levels were over 90,000, and they are supposed to be within the 150 range. I was literally off the charts and should have been dead. After being transferred to an actual hospital in Sun City Arizona (another 4 hour ambulance ride.) I had to stay there for a good two weeks until my levels were in a respectable range. And finally I was taken off work for the time being. 

It's now 2012 and that day still haunts me. I am in a huge fight with this insurance company as I imagine most people are. I can still feel my body degrading, and falling apart. My wrist has developed carpel tunnel and signs of arthritis. My elbow, back and shoulder hurt with every use, and I now require a cane to walk. Did I mention that I am in my 30's. I had about given up any hope of ever draw or have a normal life ever again. I was in such a hole that I really wanted to just give up. I wasn't getting better, I wasn't getting paid anything, and it really hurt to do anything I liked to do. Even sitting down for longer than 20 minutes would kill my back. I didn't know why I was left to just rot, and I lost all faith in people. That is until my wife reminded me how much she had never lost her faith in me. 

She bought me a special sketch book. It was suede covered, and very nice. At this time I hadn't drawn a picture in years. Not so much a doodle. She saw that I was losing myself, and I really missed it, and she knew it. She had one rule, I draw what I want. I don't judge it, and I don't share it with anyone. Just draw. 
And I did. I found small times where I would just sketch, nothing fancy or great, but I did it. My hand was shaking, my wrist was in severe pain, and my back was straining, but I was drawing. That's the only thing I focused on. I noticed over the next few pages that I was slowly getting it back. I noticed that I was actually getting a bit better. Because of the pain, and shaky hands I had to slow down. I couldn't draw for hours anymore, but with the time I gave myself to draw I was completely focused, and really looked closely at the drawings. I was no longer the fast artist I once as, who learned to animate and draw accurate lines with one stroke, but a new kind of artist that drew sketchy lines, and slowed down quite a bit. It wasn't worse, just different. 

Towards the end of the year I was at the store and I came home with a large poster board. My wife asked what that was for, and I said I am going to full this paper up with color. I was going to to a full 22" x 28" colored pencil drawing no matter how long it took. I grabbed reference shots and compiled it together. I chose the Gerber daisy because it's my wife's favorite flower, and this picture was dedicated to her belief in me. And the humming bid was because well we see them all over our back yard, and I thought it would look great in the picture. For the next three months I worked on this piece, and I was shocking myself. By the time I was done, I didn't believe I did it. I almost didn't want to finish it. After posting it online I was approached to place it in a show. At this time aside from the fairs, I had never been in a show, or a gallery. And this showcase was a juried show with professional artists. 

Something funny happened at this show. I won Best in Show. I didn't expect to win anything to be honest. Now this wasn't a money winning category, but I won. Part of the reason was my colored pencil drawing was categorized as a painting. They thought I colored this piece so well that it was a painting. Even better the judge couldn't believe the size of the piece, and he told be that he himself couldn't do it. Me I thought nah he must be buttering me up or trying to make me feel better. That was until people were shaking my hand. They were respecting me as an artist, and calling me their equal. This was all new to me. I wanted to do this all my life, and now it's possible.

So with this piece I was able to start new. I am still in a lot of pain, and may never be the same again, but now I have a future to look forward to. I have drawn many more colored pencil pieces since then, and I continue to do much more. I may not have a lot of money, or completely healthy, but I have a great family backing me, and I feel so successful as an artist because I am able to draw again, and share my work with all of you. I hope if something ever happens like this in your life that you use it to better yourself too. Don't let negative people, and negative events in your life take away your life. I wasted a lot of time in sorrow, and pain. I can't imagine where I would be now if I just gave up. I probably wouldn't be around to see how much  great things I would have missed out on. So Thank you for supporting me everyone, you make pictures like this one happen, and you make me continue to fight. And especially to my wife, thank you for finding the light in me that I thought was completely smothered in the dark. I love you. 

Thank you for reading, 

Derrick Rathgeber 

In Feed AD