Showing posts with label pinterest. Show all posts

Thursday, February 20, 2014

How to Color a Daisy With Colored Pencils

How to Color a Daisy With Colored Pencils

By Derrick Bruno

Http://HalfEvil333.com

Support & Donate by clicking the button below.
Thank you Very Much.

https://www.pinterest.com/pin/60869032437031919/


Let us begin the lesson, and thank you for your support. 

Welcome to the next lesson in colored pencil drawing. In the last lesson we learned how to layer different colors to create a solid multi-colored pink lady apple. In this lesson I will teach you how to train your brain to see your drawing as different individual pieces. The perfect way to do this is with the daisy. We will focus more on directional shading and coloring in this lesson, and how to obtain textures using different strokes.

Grab your box of Colored Pencils out and grab the following colors; Pale pink, Pink, Cerise, Ruby, Light Brown, Golden Yellow, Grass Green, Black, and White. These will be the 9 colors we will be using for this lesson.

Tip: If you would like to change the color of your flower, you may substitute the petal colors (Pale Pink, Pink, Cerise, & Ruby) to another four colors. Just make sure you go from light to dark. For example a purple flower you could use Light Lavender, Lavender, Purple, & Orchid. 

Step 1: Lightly draw your daisy using faint strokes of a pencil, or light grey colored pencil. Start with the circle in the middle of the flower. Follow that with about six individual petals all roughly the same length, but different characteristics. If you note each petal has two fold lines going down the, and the ends are jagged. Behind these petals you will draw more petals. Continue layering your petals until you are satisfied with the shape of your daisy. Now use the Grass Green colored pencil and draw two curved lines for the stem.

Tip: If you would like to skip ahead and focus on the coloring lesson. You may download the sketched out image seen below. Click the link Below.


Step 2: We are going to put down the base color for the flower. Take the Pale Pink Colored Pencil and start coloring in each petal. Now to do this we are going to use a fun technique. The reason I chose a daisy is because it’s a circle shape. You will want to color in the direction of each petal; to do this can get frustrating because you have to contort your hand into uncomfortable positions. So what we are going to do is keep our hand in the same position and rotate the paper. Use light gentle strokes across each petal evenly, and use more pressure on the lines, and towards the center of the flower. Continue rotating the paper and coloring each petal until they are covered.
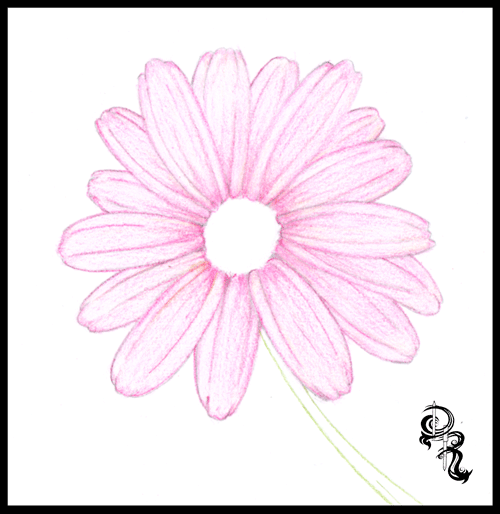

Step 3: Practice Makes Perfect. Find a petal to start with, and start adding the next layer of color. Using the Pink we will start off at the base of the petal and color in the direction of the petal. Color only the base of the petal and the center area of the petal. Again rotate the paper as you go and color in a position that is most comfortable for you and your wrist. This will allow smoother lines and more control.


Tip: Treat each petal as a new drawing. Taking your time and giving attention to each one will allow your brain to see shapes that you would otherwise over look. Remember to draw comfortably, take breaks when you need them, and just have fun.

Step 4: Using the Cerise you will continue adding more color and depth to the flower. We are going to start adding some shadows and curves to the petals. Color from the base of the petal with more pressure and lighten your strokes as you reach the end of the petal. Define the shadows for the petals underneath by using darker strokes where the top petals overlay.


Step 5: We are going to fine tune the shadow by adding one more red color. Using the Ruby Colored Pencil we will once again add more depth the flower petals. Rotating the paper as you go of course, sharpen your lines toward the base of each petal around the circle. Then define the lines of each petal using the Ruby color. Now as you rotate the paper use back and forth strokes to really get the dark Ruby color to make an even shadow on each petal towards the center of the flower to make it look like the petals fold inward.
Step 6: Now we are going to get into the middle of this flower. Don’t worry no more rotating the paper for this one, unless you want to of course. This part is actually kind of fun for me. Making a realistic pollen look is easier than it looks. Using the Light Brown find the center of your circle and make a much smaller circle. This will be your starting point. Now continue making small circles around this circle, and continue until the center is full. Once you get to the edge of the petals, use the Light Brown to fill in any gaps between the flower center and the petals. Now add some of this brown to the stem with some lines dark lines, and we will move on to the next step.


Step 7: Now it’s time to add some color to the center. Using the Golden Yellow make even circular strokes to fill in the center area. Continue going over it until you get a nice even color. Once you are finished use the same Golden Yellow color and very lightly go over the base of each petal. We do this because light reflects colors onto nearby objects. Sometimes it’s not noticeable, but just enough will make your drawing look that much more realistic. Then to finish off this step add some more light stroke lines onto the stem to give it an earthy browning like color when we go over it with the green.


Step 8: Probably the easiest step of the drawing. Take the Grass Green color, and color the entire stem. Be sure to color right over the Golden Yellow and Light Brown colors. Remember to color along with the shape of the stem in the same direction. You can even rotate the paper to give you a comfortable position and clean lines. Color the area by the flower darker show the shadow of the flower covering the stem.

Tip: By now I hope rotating the paper comes to you as a reflex. This will help you draw strait lines and curves, and can be used to draw all sorts of shapes and objects. Draw smarter not harder.


Step 9: Now to cast the final shadows. Use the Black Colored Pencil and outline the base of each petal and the flower center. Next begin shading the top petals lightly just enough to show that they curve inwards towards the center. Add some more black color to the petals underneath using the top petals as a guide. Next tilt the black pencil to the side a bit, and give a shadow to the center of the flower. Use crosshatching strokes towards the bottom of the circle to make it look like a sphere. Finally cast the shadow on the top, and down the side of the stem to finish up the shadows.
Step 10: To finish up our flower take the White Colored Pencil and color the edge of each petal. Next blend together the light and the dark colors by coloring from the edge of the petal down to the middle of each petal. This will even out your colors, and help cast light onto your drawing. Next add white to the cent of your drawing, and to the stem. And there you have it a beautiful flower.
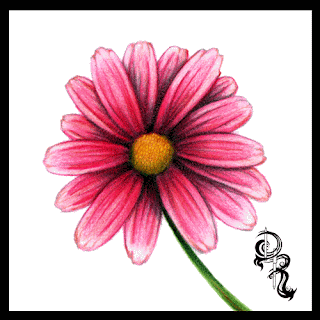

Tip: Find your light source. Sometimes when I draw I will cast a light over my drawing and see which way the paper casts a shadow. Use this as a guide for your shading.
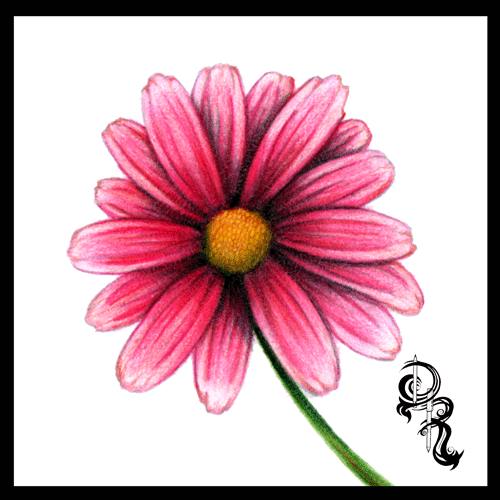
That does it for this lesson. I would love to see your work. Send it to us and we would be glad to share your results on my Facebook page at
 https://www.facebook.com/HalfEvilProductions

More Free art lessons are available on my Pinterest page at: 

If you would like to ask a question or make a suggestion for a drawing lesson email me at DerrickBruno@HalfEvil333.com

Thank you for coming.
Derrick Bruno

Friday, September 20, 2013

Pencils of Color to Unleash Your Imagination

What drives you as an artist? I strongly believe that there is a hidden unleashed artist in all of us. We often feel limited or stuck trying to find ourselves. Have you ever had that image stuck in your head that you cannot seem to escape? It follows you everywhere, at work, doing chores, listening to music, and in your dreams. You try to draw it but find yourself making mistakes and wasting mounds of paper. You can’t figure out why you cannot draw a stick figure to save your life when you have drawn portraits,  and landscapes flawlessly in the past. Well Today in this blog I am going to give you a glimpse into how you can begin to make the changes to unleash your potential.

The biggest problem is finding what medium you feel most comfortable with it has to be an extension of you. For me it just happened to be the pencil. The next thing you have to figure out is your style. Each of us has a unique fingerprint, and in art we each have what I like to call an “Art Fingerprint.” An Art fingerprint is an original style that no one on the planet can replicate, almost like your signature. Sure they may try, but all copies will be just that another copy. You have to let go and find your own style to do that you have to take yourself back to that one point in time when you were really excite to finish a piece of art. It could have been when you were a child, in school, or a week ago, but that moment when you caught yourself off guard paused, and smiled at your picture. It’s that excitement you have to get back, and pull into everything you do.

When did art become work, and competitions, and who can sell the most? It’s a pressure that we all face especially in this age of modern sharing on sites like Instagram, Pinterest, Facebook, and so on. Likes, comments, and shares to the highest bidder. When we don’t see the results we like we fall backwards in fear that our work is maybe not as good as the artist with over 10,000 hits. I will be the first to admit I fell into the category of envy of other artists who hit these numbers because I don’t have the income to pay for ads, or other forms of web advertising. I am going to tell you some wise and great advice that someone very smart once told me… (my wife.) They are just numbers, and do not represent the great artist you are. Remember that as you are fighting an invisible battle online to become viral, because the greatest artists that ever existed were alive WAY before the internet was born.  So do not let competition hold you back. Pressure to succeed in today’s market had me torn, and had me creating art I thought people would like. I changed who I was in the artwork, and it wasn’t me at all. It became only business, and it made me very unhappy. I was un-motivated with no passion to continue drawing the same tired drawings that had no imprint of me in them at all. It was funny how me trying to fit in with the art community and be seen with them was what got me lost in the shuffle. I was just another artist with no originality, and I had lost who I was in the process. I needed to change or I was finished.

So what got me motivated again, the catalyst that broke the mold. It was something as simple as a sketchbook, and freedom. Eliminate the pressure, and just draw. You have to just let loose and let it all come out. No techniques, no references and no hesitation. Just draw the first image that comes to your head. T doesn’t have to be the best image in the world, just enjoy it. You don’t even have to finish it. Then for the next week  I challenge you to do it again, and again. You will start learning how you perceive your imagination. You might even shock yourself a bit, and may be able to find that you had more to show than you thought. The trick is to continue pushing what is hidden within. By just drawing out your thoughts, and experiences you begin to let go of all the pressures the world places on your shoulders.
The next thing you will want to do is refine it. Take the images you drew for the week, and just revisit them all. Ask yourself how you felt when you were drawing them. Find out what motivated you to draw them, this may go deeper in your core than you thought, and bring more than just art out, but I guarantee that you will feel much better when you do.  It may help to write your own journal or blog about each of the seven drawings. Nothing elaborates, but it will help you find out what motivates you to draw, and why you started in the first place. In doing this and remembering your reason for art, you will also come to remember the passion that brought you to art. I want you to carry that passion onto your own new original piece of artwork.

Skin through your artwork in your sketch book and choose your most favorite image. Not the most detailed, but the one that catches your eye. It may be more than one. I want you to incorporate this image into your next large piece. You can even take multiple images new and old from this sketchbook, and compose them into one great image or piece. Take your time on this one, and really enjoy it.  Make it yours and give it your style, your art fingerprint if you will. Place yourself in the scene and picture yourself there. The sights, smells, movements, take it all in and enjoy it. Use references only to refine your image, such as the flowers you drew, or people. Don’t simply copy the image left to right, or up and down like a printer. Move across the paper with randomness, or start from a different spot than you are used to just to get you away from all that technique that locked you down. The point of this is to find out who you are as an artist. In school we learn to look at a picture and make a copy of it, I want you to take that picture right out of your head, and draw it to the paper or canvas.

What it all comes down to is the fear and the challenge. The fear that no one will appreciate your imagination, or understand how you think. To be honest it doesn’t matter if they do or don’t. The only person you have to impress is yourself. It’s your art, and your mark on the world. To put it another way do you want to be remembered as the artist who copied other art, or the artist that broke free and decided to do something never before seen. Me I would rather never sell a piece of art and be original and happy doing it, than an artist that just drew pictures that someone else already did. I want you to challenge yourself and bring out the best artist you can be.

 (Then again I would really love to be an original artist and sell artwork too, feel free to check out my website on the links below to find out how you can purchase the originals. :D Cheap plug.)

Thank you, and I hope to see more new great artwork
Derrick Rathgeber


Feel Free to share your art with me at Pinterest.com on my open group boards. http://Pinterest.com/DtheArtist/

Tuesday, June 25, 2013

Twisted Fate: Show Off by Derrick Rathgeber

Twisted Fate: Show Off
by Derrick Rathgeber
Twisted Fate: Show Off by Derrick Rathgeber
Our Fate decides to create an elaborate pulley system with the threads of life. This can’t be good…Awesome maybe.
Visit the Twisted Fate comic strip series on Pinterest at http://pinterest.com/derrickr333/twisted-fate-by-derrick-rathgeber-comic-strips/
Be sure to find me on Facebook for more fun and great arthttp://Facebook.com/DerrickRathgeber
Thanks again, 
Derrick Rathgeber

In Feed AD