Friday, August 30, 2013

Featured Artist/Photographer - Tony Murtagh

Featured Artist/Photographer
September 2013
Tony Murtagh
 
Tony Murtagh bought his first decent digital camera (a Panasonic Lumix) prior to going on his safari to Kenya in February 2010, after which he decided to take photography up as a serious hobby.
 
He has now changed to a Cannon DSLR. and has had photographs published in the national press in both England and Australia and on a local company's calendar for the last two years.
 
In January 2013 his photo of a 'Three Headed Giraffe' made it to the final of the Wanderlust Travel Photo of the Year in the Wildlife section.
 
He lives in Bicester, Oxfordshire and enjoys photographing landscapes, wildlife and plants and flowers, both locally and in Europe and Africa.
 
The galleries on his website show his travels around Africa, Europe and the UK as well as some general galleries featuring wildlife, birds and more parochially, his garden!
 
His work can be viewed at his web site http://tonysphotos.eu/ on Flickr at http://www.flickr.com/photos/tonykro/ and may be purchased in a variety of formats from tony-murtagh.artistwebsites.com or photo4me.com/tonysphotoseu
 
He also runs a blog at http://www.myblog.tonysphotos.eu/ and a Facebook Page at https://www.facebook.com/TonysPhotosPage.
 
A photo on Flickr
 

A photo on Flickr
A photo on Flickr
_______________________________
 

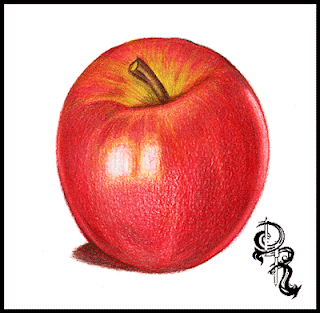
How to Color a Delicious Pink Lady Apple with Colored Pencils


How to Color a Delicious Pink Lady Apple
by Derrick Bruno

Http://HalfEvil333.com

Thank you for your Donation & Support!


RoseArt Colored Pencils we will be using.
White
Golden Yellow
True Orange
Bronze Yellow
Celery
Cardinal Red
Cherry Red
Raspberry
Brown
Black

Welcome to the great drawing lessons here on Derrick the Artist. Today I will be teaching you how to color your very own delicious pink lady apple. In this exercise I will give you tips on how to over lay colors, blend them to create lights and shadows, as well as textures. So let’s get started shall we.

Step 1: If you are comfortable with your drawing skills start off your picture by drawing the apple shape below with the brown colored pencil. Remember your apple does not have to be a perfect shape because no apple is a perfect sphere.


Tips: A PDF version is available if you would like to skip this step and go right into the coloring. Download the printable version by clicking the link below:


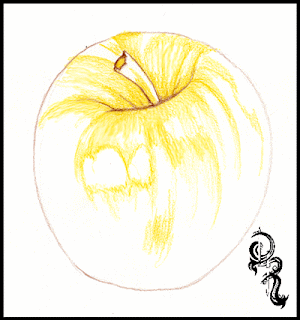
Step 2: Using the Golden Yellow make dark to light strokes outlining the shine. Start at the base of the step and define the shape of the apple. This color will act as the base and guide for the rest of the colors to come. Next use the Bronze Yellow and darken the yellow areas on the stem and the area around the stem. This will help blend into the green Celery color in the next step.


Tips: Use more pressure on the pencil at the edges and around the shine areas, then slowly raise the pencil up decreasing the pressure of the pencil.


Step 3: Using the Celery color you will go over the Golden Yellow color on the top of the apple. Start from the base of the stem and create line in arcs to the rim of the apple, then fill them in with the Celery green covering a good area of the top, but leave some areas available for the red to come through. Also add some Celery color to the stem as well.

Step 4: Now it’s time to set the base for rest of the apple. Using the True Orange we will start from the stem base and color the apple almost like a pumpkin. Fill in the top half of the apple leaving small empty spaces along the edge, and along the base of the bottom. Keep a white strip-like area empty along the right side of the apple, as this will act as a reflective shine making the apple look more realistic.

Tips: References are great. If you have an apple at home shine a light on it to see how light shines and reflects on it so you can replicate this effect in your drawing.


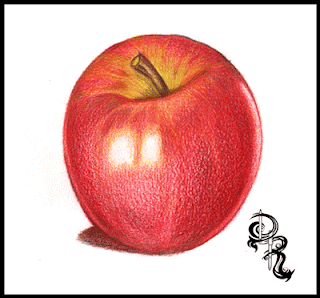
Step 5: It’s time to watch your apple come to life. Use the Cardinal Red and cover the apple in nice even strokes with the apple from top to bottom and at a curve. Remember to leave the large shine in the center, and on the right clear. I like to rotate the paper so I can keep my hand still and move only the pencil across the paper. Once the apple is covered evenly begin adding pressure and coloring in areas darker near the edges and the top of the apple. Leave the area near the large shine lightened as shown in the picture.

Tips: Try to keep your pencil stokes in one direction. In this case arc them downward creating the illusion of a round object. After you have covered the area you can crosshatch to darken areas of the drawing.


Step 6: The candy apple read that makes you drool. That’s what we are going for. So let’s add the next layer of red. This time we are using Cherry Red to help fill in gaps, smooth out our fruit, and generate a one of a kind look. Starting at the borders of the apple we are going to go over theCardinal Red and start coloring towards the shine lightening our strokes along the way. Also get the top of the apple, and overlay the red partially over the yellows and greens to pull it all together. When you are satisfied with the look of your apple, move on to the next layer of red in the next step. Yep that’s right Three layers of red.


Step 7: This is the last layer of red I promise. Grab the Raspberry Red colored pencil and use heavy pressure along the areas you want to add shadows to. You can use the image as reference or use your gut. Get the areas close to the edges, and highlight the shine on the top near the stem. At this point your apple will have a realistic shine and reflect the paper it is drawn on. As an option also use this color to create a shadow on the floor. Remember where your light is coming from and color your shadow based on that. In this case I have light coming from the rear and the front so the shadow is outlined as shown.

Tips: If your drawing doesn’t look like the image shown do not worry. If I were to draw this again mine would look different too. Remember to enjoy yourself and take your time.


Step 8: Time to give your apple an earthy look, and finally give that stem some color. Reach for theBrown and fill in the stem from base to top leaving some green color. Remember to color with the stem shape, and for an extra measure of realism sketch some harder lines. Next add a layer of brown across the entire apple, and the shadow. Remember to leave the shines white. Adjust your pressure to the level that you want. This gives the apple some more texture, and colors to capture the eye.

Tip: If you would like to color the apple with other colors you can use these techniques with most fruit and objects. Simple adjust your color palette, and have fun.


Step 9: We are now heading to the final touch ups. Get a hold of the Black pencil and we will finalize the shadows. Start off by coloring over the shadow on the ground. Once you are finished start darkening the left side using the shines as a guide to stop. On the right side of the apple you will start from the white strip and go from heavy pressure to light pressure as you meet in the middle. Then add some dark areas in the stem to show that the apple dips in. Once you are satisfied with your look we will move on to the final step.

Tips: Black is your friend. With colored pencils you can cover other colors without making over shadowing them completely. If you need to go darker simply add another layer.

Step 10: And we are at the finish line! This step is probably one that most people don’t see coming. Go ahead and take the white pencil, and start coloring over the entire apple. You will notice that as you color the colors will not only lighten up but they will blend together and smoothen out. This is probably one of the greatest kept secrets, and now you know. The white colored pencil is probably the most important pencil in your collection.


Thank you for visiting and I hope you enjoyed this lesson. More are available right here on my blog page, and at http://RoseArt.com/Blog. Be sure to check out my website for more updates, and upcoming lessons, and new art at Http://HalfEvil333.com


Thursday, August 29, 2013

Featured Art - Angel of Death by Derrick Rathgeber (DerricktheArtist)

Angel of Death

Medium: Colored Pencils/ Bristol Smooth 11" x 14"

Original Price: $400.00 -  Click Here to Buy Now. 

This purchase qualifies for 60 days same as cash financing with PayPal.  

Prints are Available:

 
Angel of Death is a tragic illustration of the original poem by my wife. This 11 x 14 colored pencil drawing shows the dancing of death in the pale moonlight in visual that I can't begin to describe as she did in her poetry. The poem Angel of Death by Patricia Rathgeber can be found on her blog page.

http://snsaintalwaysnice.tumblr.com/post/51843925243/angel-of-death-by-patricia-rathgeber-come-dance

Own the original today.

Wednesday, August 28, 2013

It's Imagination that Brings me Back to Reality.


Beyond Imagination 
It's Imagination that brings me back to reality. 


Over the last year I have been retraining my art style to meet the needs of the art community. I wanted so hard to show that I belonged in the professional world. Growing up when ever someone would introduce me as an artist they would say yeah this is Derrick he draws monsters and characters and stuff. I have heard the phrases weird, odd, strange, goofy, and all I heard was limited. I really felt off because I didn't want to be limited. In a business sense people buy art based on the artist's name. My name was synonymous with the words listed above, and I felt if I was going to sell anything I thought I had to get out of that cage. 

I started to draw the large animal pieces like Bird in Bloom, and The Flight of the Macaw using reference shots, and composing them originally. These pieces really hit big with the community, and got my name out. I won my first art show with the Bird in Bloom as best in show, and I was saying to myself, maybe they were right all along. I really limited myself by drawing things I loved all the time. Do I really have to draw from life, and make the images look real to get noticed? Over time I drew more realistic pieces like the Dolphins in the Reef, and I started to feel chained up. It didn't feel like drawing anymore, and I didn't want to do it. I took a good month off of drawing, until I had a vote on my site about what animal I should draw next. The results came in as a horse. As we all know there are millions of horse art all over the web. I was kind of reserved about drawing one, until I had a thought. In my mind I found a glimpse of the image I was going to draw, and I was energized again. I had drawn horses many times before. In my animation class we had to draw hundreds running, and jumping, flying you name it. For my horse I wanted power so I drew Hraunkot a horse born from the lava enriched ground. It was this moment that it dawned on me, I missed my imagination. 

I put my foot down with this next piece, and gave myself some rules. Other than looking at my hands and drawing them on the paper, I would draw random images without looking at anything. This piece would be called "Beyond Imagination." 

DAY 1: Today I charged in and set up the paper with the border, and the outline placement of the hands. In my head I envisioned an image coming to live born from the paper. To show this I did something a bit different and drew the picture in both pencil sketch, and colored pencils.  The first thing that came to mind was a dragon. Something that could be large and small at once just setting the tone for the picture. I drew the dragon climbing off the paper using my arm as a stepping stone, almost like it's getting ready to fly off the paper. To blend the two worlds of art and reality I added a yellow & red burn effect ass the color and grey-scale start to blend together. 


Day 2: Each day I like to add just one more subject to the drawing so I can focus on one at a time like each part is it's own piece. Today I decided to throw in a flying witch, who also resembles a sorceress. In my character designs I like to add detail. But it has to be detail that makes since. In this case I added small but intricate designs on her outfit that you may see, and purple is my little three year old's favorite color so that worked out too. I think this part of the picture works nicely because she adds movement to the dragon. Almost saying charge. 


Day 3: This is probably my favorite part of the picture. The rising phoenix that comes off the page. Originally I drew the phoenix much different. It was all flames that came out of the clouds in the form of a bird. I looked at it, and said nah it just wasn't me. So I imagined what I thought a phoenix may look like in my imagination and the result is what you see below. You can see the heat coming off the ancient bird, and at the same time the magic. I had the markings look as if they are illuminating, and the feathers glowing on fire. And at the same time it looks like it could fly. You can't see it yet, but I have him flying out of the border as well. It just ties everything together. 


Day 4: As I was drawing the left side of the page, I couldn't stop saying "Release the Krakken!" I remember drawing a Krakken as a kid, and it looked something like this, of course a lot less detail then. I wanted to add some adventure to the drawing, something like that of pirate adventure story. In this adventure the Krakken was so big it folded the drawing paper creating a tidal wave. It started to look like a drawing, inside of a drawing....coming alive out of a drawing..while I was drawing...yeah something like that. ( I think I hurt myself.) 


Day 5: I love it when a drawing just comes together towards the end. At this point it's really hard not to pull an all-nighter and blaze through it. But that is when you begin to rush and make mistakes. Today I started drawing the paper.on the paper (not that again.) and really defining the stylish clouds. We have all been told to get our heads out of the clouds, and that is why I drew everything in the clouds. From the volcano exploding swirled smoke, to the ocean splashing the cloudy waves against the rocks. It was all dreams and imagination coming to life. And what are clouds without the sky, and a rainbow shooting across the sky. I added a rainbow forming into shooting stars to merge the waves and the night sky. The final touches are all sketched out, and ready for tomorrow. 


Day 6: And it's the final day. A good six day project that was a whole lot of fun. Not only did I complete my challenge but I found a lot of me that I lost in the process of creating this drawing. Have you ever had that moment where you were worried about messing up a part of your drawing, and turns out to be the best part? I did, and I am very happy with the hands. You can't see it in this picture, but I got all the little hairs on my arm, and the ring metal was spot on. I even cast the shadow onto the paper using my desk light as a guide. Once finished I moved onto the space area, and the paper. I wanted to make the paper..on the paper (here I go again..) look like parchment. So I used browns and golds in with the grey color. With that final touch it all came together for me, and I am very happy with it. Once I get a better picture of it, I will add it to my shop, and have it ready for prints for all who are interested.

I am really glad to have you all here reading this as I share my thoughts with you all. Each drawing is an extension of you as an artist. A poet writes her thoughts, and puts it all out there. A Photographer uses their camera to show the world how they view it, and writers can pull you into their world. We use pencils, and brushes to build and shape the paper into the world as we see fit. And that's why I came up with the saying, "A World Beyond Imagination is Only a Sketch Away."
I am glad you enjoy my work, and my world of imagination, and I would like to do more pieces like this, as well as commissions, and real life studies. A good balance makes an artist happy. do what you love, and don't get caught up with your love for art becoming work. It can hurt your artwork, and limit your abilities.

Have a great day,

Derrick Rathgeber
Derrick the Artist
http://Derrickr.webs.com


Sunday, August 25, 2013

"If you can dream it I can draw it."

Art Commission Fees

"If you can dream it I can draw it."

Portraits, Animals, character designs, and a full scale drawing from description. Nothing is out of reach. Contact me today with your ideas and what I can do for you. 

- GREY-SCALE PENCIL ARTWORK -

Size             Price
8" x 10"       $100.00
11" x 14"     $200.00
18" x 24"     $400.00
22" x 28"     $500.00

- COLORED PENCIL ARTWORK -

Size             Price
8" x 10"       $200.00
11" x 14"     $300.00
18" x 24"     $500.00
22" x 28"     $600.00


Contact me today at Derrickr333@gmail.com or visit http://Derrickr.webs.com/.


Thursday, August 22, 2013

New Art for Sale on my New Web Store.

PURCHASE THE ORIGINALS

 
Purchase the originals at http://derrickr.webs.com/apps/webstore/
 
Welcome to the Official Derrick the Artist Store Front. Where you can purchase signed artwork by the artist. Derrick Rathgeber is a worldwide award-winning artist who has mastered the colored pencil. His drawing style literally breaks the bounds of the paper and imagination as his work comes alive off of the page. There is something for everyone, shop today. 


Multiple payment options are available including 60 Day same as cash financing using PayPal on purchases over $99 USD. 

Prints are also available at http://pixels.com/profiles/derrick-rathgeber.html

Find out what's new, and what's on sale. 


Wednesday, August 21, 2013

Don't Let Life Hold You Back.

It's been a while since my last post. There has been a lot going on in my life that has put a strong hindrance on my ability to focus on my artwork, and website. As most of you know I don't make a living off of my work, one day I would like to, but for now it is a fun hobby. I enjoy all the feedback, the chance to share lessons with you all, and of course any advice I can give.

I feel lately that I needed some advice and help, and I wasn't getting that in return. I reached out, and got nothing. I'll admit part of me was really bitter and spiteful. I ran scenarios in my head wondering how convicted killers could get donations in the thousands for the best lawyers, or how people come together to build a brand new home for someone that already has a nice trailer home, because they felt it was too small for them. I didn't understand and I was going down a really dark road in my head. I think the nail in the coffin was when I asked a company I have been supporting all this time with free lessons, and promoting their products with my artwork completely blew me off. All the plans we made in the beginning for a duel artist pencil sponsorship and advertisement went right out of the window after they got what they wanted. A free art lesson from an artist that used their pencils because it was all he could afford. It's not the first time I have been burned by the big corporations either, but that is many other stories, and I don't want to be that guy anymore. I am done reliving failures, or believing I have have failed due to my situation.

Regardless of where I am in life I have to remember that others are either in the same position I am in, or worse, and I have to remember that they look up to me. I felt recently that I let those people down because I cracked under pressure. I stopped drawing, and I stopped making lessons. I just froze up. Just know I am still here, and I have more work to show. I have more help to give, and I look forward to helping again. I am sorry I was gone for a while, but I am back, and I don't want to let life interfere with my love for art ever again. I may need some help with that.

I just need to know that what I do here, and on the web is worth it. I pour hours into the lessons, and I don't ask for money like other sites or artists do. If it helps you learn a technique that improves your work that is my payment. In time I will eventually make a book, but for now I just like to help out because I know there are artists that cannot afford to pay for lessons. The same for my comic strips. They make me laugh, and I am happy to know that it made someone laugh. And my artwork, I plan on drawing some more again, in fact I set up the paper for a new piece today. It will be a black and white and that is okay with me. I am going to stop placing rules on my artwork, all that did was hold me back, and make me unhappy.

After all of this I am in a better place. Looking back on what I wrote I feel that I needed to get somethings off my chest if I were to continue. I am going to start drawing for me for a while, and I promise to share new lessons. In fact my daughter gave me the idea for the next lesson. She wanted to learn how I draw trees so fast and realistic so look forward to that in the near future. My next piece on the other hand, you'll just have to tune into my Facebook page for updates, and work-in-progress images. What I can't give out all the details right? I didn't go away for good, but I did fall asleep for a bit. Thank you for sticking around and supporting me through it all. I have learned one all powerful lesson in all of this.

Support doesn't always come in the form of a dollar sign. Your kindness, comments, likes, and just all around support for my work. It helps make everything I do worth it, and I cannot wait to do more. I am not going to let life's obstacles hold me back anymore.

Thank you,
Derrick Rathgeber
http://Derrickr.webs.com
http://Facebook.com/DerrickRathgeber
Donations Accepted


In Feed AD