Friday, March 21, 2014

It's Imagination that Brings Me Back to Reality

Beyond Imagination 
It's Imagination that brings me back to reality. 

Over the last few years I have been retraining my art style to meet the needs of the art community. I wanted so hard to show that I belonged in the professional world. Growing up when ever someone would introduce me as an artist they would say yeah this is Derrick he draws monsters and characters and stuff. I have heard the phrases weird, odd, strange, goofy, and all I heard was limited. I really felt off because I didn't want to be limited. In a business sense people buy art based on the artist's name. My name was synonymous with the words listed above, and I felt if I was going to sell anything I thought I had to get out of that cage.

I started to draw the large animal pieces like Bird in Bloom, and The Flight of the Macaw using reference shots, and composing them originally. These pieces really hit big with the community, and got my name out. I won my first art show with the Bird in Bloom as best in show, and I was saying to myself, maybe they were right all along. I really limited myself by drawing things I loved all the time. Do I really have to draw from life, and make the images look real to get noticed? Over time I drew more realistic pieces like the Dolphins in the Reef, and I started to feel chained up. It didn't feel like drawing anymore, and I didn't want to do it. I took a good month off of drawing, until I had a vote on my site about what animal I should draw next. The results came in as a horse. As we all know there are millions of horse art all over the web. I was kind of reserved about drawing one, until I had a thought. In my mind I found a glimpse of the image I was going to draw, and I was energized again. I had drawn horses many times before. In my animation class we had to draw hundreds running, and jumping, flying you name it. For my horse I wanted power so I drew Hraunkot a horse born from the lava enriched ground. It was this moment that it dawned on me, I missed my imagination.

I put my foot down with this next piece, and gave myself some rules. Other than looking at my hands and drawing them on the paper, I would draw random images without looking at anything. This piece would be called "Beyond Imagination."

DAY 1: Today I charged in and set up the paper with the border, and the outline placement of the hands. In my head I envisioned an image coming to live born from the paper. To show this I did something a bit different and drew the picture in both pencil sketch, and colored pencils. The first thing that came to mind was a dragon. Something that could be large and small at once just setting the tone for the picture. I drew the dragon climbing off the paper using my arm as a stepping stone, almost like it's getting ready to fly off the paper. To blend the two worlds of art and reality I added a yellow & red burn effect ass the color and grey-scale start to blend together.


Day 2: Each day I like to add just one more subject to the drawing so I can focus on one at a time like each part is it's own piece. Today I decided to throw in a flying witch, who also resembles a sorceress. In my character designs I like to add detail. But it has to be detail that makes since. In this case I added small but intricate designs on her outfit that you may see, and purple is my little three year old's favorite color so that worked out too. I think this part of the picture works nicely because she adds movement to the dragon. Almost saying charge.


Day 3: This is probably my favorite part of the picture. The rising phoenix that comes off the page. Originally I drew the phoenix much different. It was all flames that came out of the clouds in the form of a bird. I looked at it, and said nah it just wasn't me. So I imagined what I thought a phoenix may look like in my imagination and the result is what you see below. You can see the heat coming off the ancient bird, and at the same time the magic. I had the markings look as if they are illuminating, and the feathers glowing on fire. And at the same time it looks like it could fly. You can't see it yet, but I have him flying out of the border as well. It just ties everything together.


Day 4: As I was drawing the left side of the page, I couldn't stop saying "Release the Krakken!" I remember drawing a Krakken as a kid, and it looked something like this, of course a lot less detail then. I wanted to add some adventure to the drawing, something like that of pirate adventure story. In this adventure the Krakken was so big it folded the drawing paper creating a tidal wave. It started to look like a drawing, inside of a drawing....coming alive out of a drawing..while I was drawing...yeah something like that. ( I think I hurt myself.)


Day 5: I love it when a drawing just comes together towards the end. At this point it's really hard not to pull an all-nighter and blaze through it. But that is when you begin to rush and make mistakes. Today I started drawing the paper.on the paper (not that again.) and really defining the stylish clouds. We have all been told to get our heads out of the clouds, and that is why I drew everything in the clouds. From the volcano exploding swirled smoke, to the ocean splashing the cloudy waves against the rocks. It was all dreams and imagination coming to life. And what are clouds without the sky, and a rainbow shooting across the sky. I added a rainbow forming into shooting stars to merge the waves and the night sky. The final touches are all sketched out, and ready for tomorrow.


Day 6: And it's the final day. A good six day project that was a whole lot of fun. Not only did I complete my challenge but I found a lot of me that I lost in the process of creating this drawing. Have you ever had that moment where you were worried about messing up a part of your drawing, and turns out to be the best part? I did, and I am very happy with the hands. You can't see it in this picture, but I got all the little hairs on my arm, and the ring metal was spot on. I even cast the shadow onto the paper using my desk light as a guide. Once finished I moved onto the space area, and the paper. I wanted to make the paper..on the paper (here I go again..) look like parchment. So I used browns and golds in with the grey color. With that final touch it all came together for me, and I am very happy with it. Once I get a better picture of it, I will add it to my shop, and have it ready for prints for all who are interested.


I am really glad to have you all here reading this as I share my thoughts with you all. Each drawing is an extension of you as an artist. A poet writes her thoughts, and puts it all out there. A Photographer uses their camera to show the world how they view it, and writers can pull you into their world. We use pencils, and brushes to build and shape the paper into the world as we see fit. And that's why I came up with the saying, "A World Beyond Imagination is Only a Sketch Away."
I am glad you enjoy my work, and my world of imagination, and I would like to do more pieces like this, as well as commissions, and real life studies. A good balance makes an artist happy. do what you love, and don't get caught up with your love for art becoming work. It can hurt your artwork, and limit your abilities.

This Piece is currently on display during the 
 
Location: Riverside County Administration Center 
4080 Lemon St. 
Riverside, California 92501
You can find my artwork on the Fifth Floor in the Board Room.

Hours: 8:00am - 6:00pm 

Have a great day,

Derrick Rathgeber
Derrick the Artist

Thursday, March 13, 2014

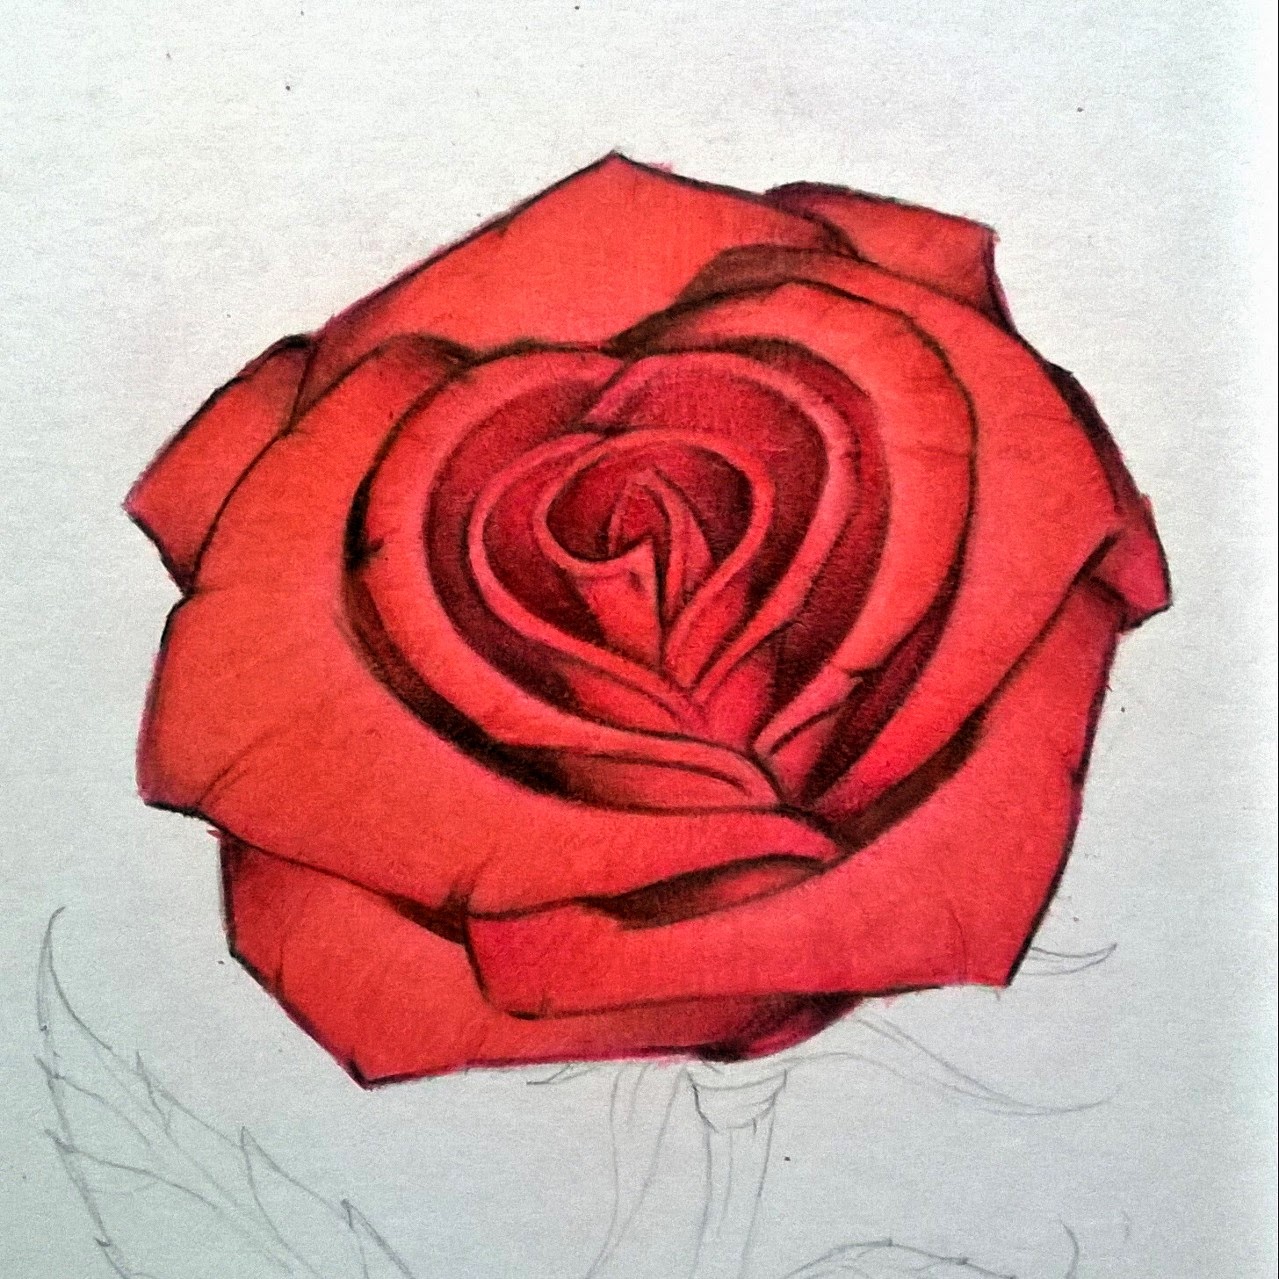
How to Draw a Rose with Colored Pencils

 by Derrick Bruno

Http://HalfEvil333.com

Support & Donate by clicking the button below.
Thank you Very Much.


In this lesson I will be teaching you how to create a lovely red rose using some different techniques. We will focus on using colors to add depth and layers into your work to give your artwork that look that has them coming off the page. Another focus we will work on is overlaying colors, and texture shading. I use RoseArt pencils and the colors listed below are what I used for this lesson.

Tip: If you do not have the colors listed below it is okay. You can use 3 shades of red from light to dark, 1 pink, one green, a sienna/yellow color, a brown, and a Black for shadows. 

·         Black
·         Brown
·         Sienna
·         True Green
·         Ruby
·         Cherry Red
·         Red
·         Blush Pink


Drawing the Rose:  We are going to start by lightly sketching out our rose. I like to start at the middle of the flower using spiral curves. As I build the middle I like to braid each side left to right. When I get closer to the edge each petal grows a bit larger. Keep the basic shape of the rose, and use references as needed. Have fun with the stem and add the leaves. I like to have the leaves jagged with curved tips. It gives them character and makes the drawing fun. Remember not to focus on a lot of detail for the sketch and draw lightly. We are going to use this lesson to add details by coloring with the pencils.


Step 1: To start bringing this lovely flower to life we are going to use the Brown first. Lightly shade each area of the rose on the outer edges of each layer. Once you get to the outer layers you are going to shift the direction of your shading to follow the curves of the petals. When you get to the outer larger petals you are going to give them their shaped edges, and details. Start from the edges and draw dark lines where the petals buckle a bit, then starting from one side of the petal and shade from side to side with the curve of the flower towards the center.


Step 2: Next we will define the rose by adding the lightest color. Using the Blush Pink (Pink) We are going to add a layer of pink to the inner area of each petal. You can shade with the curve of the lines from dark to light. We really want the pink to show through because this will help define the shape of the rose and keep the details from getting lost in the layers of red on top of red.
Tip: Keep the pink out because we will use it towards the end to define the highlights & tones.


Step 3: This is the step where you are going to get into the picture. We are ready to add our first touch of red, or in this case Ruby (Darker Red). Start coloring over the brown towards the middle of the flower using medium pressure. If you look at the picture you will also notice that you will want to fill in the corners of the petals and shade from dark to light towards the middle of each petal. By this time you will start to see the flower bloom outward.


Step 4: In this step we are going to fill in the rose with a nice even texture. This is one of two layers on the rose petals that will fill in the vibrant colors. Using the Cherry Red (Medium Red) you are going to use nice even back and forth strokes along the petals. Try to make the lines have some spacing and sketchy this will be filled in with the last shade of red. By keeping them sketchy and the same direction with the flower, you will give the flower a nice texture with little effort. It’s a fun trick, and another reason I love colored pencils.


Step 5: This is one of the shorter steps. We are going to fill in the white area in between the petals with a flat color. Grab the Brown, & Ruby colors and fill in this area. Use as much pressure as you feel comfortable with, but fill it in clean and even using both colors. And with that we move on. I told you it would be pretty quick.


Step 6: We are now going to define the shadows with this step and give our rose a nice clean look. Using the Red Pencil go over the entire flower. Remember to color in the same directions as the other steps. This will fill in any gaps and make the petals solid. Now you will use the Blush Pink and define the highlights around the center of the petals. Now use the Black pencil and begin to really define our Rose. Color nice clean lines along the curves of the inner rose petals as shown in the image above. Start from the center of the rose shade from dark to light on each area. As you move down the flower start shading from petal to petal starting at the sides and shade towards the center. As each petal over laps that is where you will add the shadows from one petal to the other. This will give you a nice layered 3d look. And with that we will begin on the stem and leaves.


Step 7: Using the Brown you will define the lines in the stem. Start with the border, and move inward making wood like lines up and down the stem following the curves. With the leaves you will sketch lines from the center of the leaves to the middle. Make them very sketchy and sparse. We will color over these as we did with the rose petals.


Step 8: In this step we are going to repeat but add to the Brown color to create more of a realistic stem. Using the Sienna (Yellow/Tan) add some more lines up and down the stem, and fill in some areas. With the leaves you will lightly shade from the center to the edges in a back and forth sketchy motion. Don’t fill in the entire leaf with this color you want to leave gaps. Remember you want the color to show through, but not become the dominant color of the stem. What this will do is add layers and make the flower come off the page.


Step 9: Now to make the Flower look young and alive let’s make the stem green. Using the True Green (Green) color the stem from top to bottom with small even strokes. You want to fill in the gaps and color over the other two colors. You will notice how the colors blend together at this point and see your green become a nice blend of earthy colors.


Step 10: Here we are at the final step of our lovely red rose. Using the Black add your final shadows on the stem. Start at the top where the flower petals overlap the stem and leaves. As you go down shade on the left side, and the top of the leaves moving from dark to light. Finally at the bottom add black and move upwards showing the cut stem’s edges. Remember to use your best judgment on the shadows and highlights of your rose. What I like to do is have a light next to me and see how the shadows fall on the page. You can even go one step further and cast a shadow onto the paper from the rose. Make it your own, and have fun.

Tip: Remember the direction of your shading, combined with pressure will give you your textures. This is what you will learn as you go as you begin to develop.

This would conclude our lesson. I want to thank you for visiting and allowing me to help you grow as an artist. Remember if you have any questions feel free to email me at DerrickBruno@HalfEvil333.com, and I will answer them the best I can. I would like to see your own roses too.

Feel free to share them on your favorite Social Media Sites Using the Hash tag #HalfEvil333 I would love to see your progress and work.

Tuesday, March 4, 2014

Derrick the Artist is on the Rise!


Oh what a fantastic start for 2014. Where would I be without family, friends, and my fantastic art community? Not where I am today I can guarantee that. I have some building to do, and a bit further to climb, but the direction I am going is definitely the right one. 

Over the past few months I have had some ups and downs on the course of my art career. I missed a few promotions here and there, and even more shows, but that is all in the past. It's funny how God works. Just when you feel angry with him, and you begin to think that he is not listening, he shows you he is. Last month I wrote about my anger with the world. How I have given all that I can give, and I felt it was my turn to get some help now that I needed it. When that help didn't come right away I was angry. I felt like a spoiled brat, but at the same time I knew it was good to voice my frustrations. A few weeks went by and although nothing had changed I felt a change in the air. It was like the pressure I placed on myself had lifted, and I forgot why I was angry in the first place. And that's when everything changed. 

The name Derrick the Artist was already on the Rise. This year alone I have already started my first large show. The Annual Artscape in Riverside, CA. This show is big, and runs from February to August of 2014, and in May I have been asked to draw a few pieces for the Riverside Prom, and join the committee. My artwork which is produced using RoseArt brand pencils is going to be see by a whole lot of professional artists all over. I have never been able to pay for the expensive brand name pencils and to me that didn't make a difference. I used what I had, and did not understand the impact that would have on the people around me. 
On this blog you will notice that I give art lessons using the RoseArt pencils. Despite the critics the pencils are a great price range that all people can afford, but to me they output fantastic colors. As I started to make more lessons using pencils that more students, and young children were using I found there was a need for these lessons to be accessible. I have been getting a whole lot of thank you letters and messages asking me to make more, and they like to know that because they cannot afford the high priced art supplies they to can produce award winning art as well. They weren't limited to their budget like myself. I like being there for these young adults and artists who have questions. It feels good, and eventually I would like to set up an artist mentoring program on a volunteer basis as one of my goals. For now I'll continue building, and working for it. 

Another big deal for me that I received recently was a donation on my website by a lady from Kentucky. No kidding I was running out of colors to use, and I was seeking donations to purchase new pencils, and paper. My last black had whittled down, and I kid you not that morning I received a donation that allowed me to purchase enough materials for the next few months. I am usually the one outputting all that I can, and I cannot believe that someone felt I was worth investing in. It really brought my soul back to life, and I was lifted up with ambition to do more. I cannot wait to pay it all forward and giving all I can give, and teaching all I can teach to all that will ask or listen. 

So as I am on the rise be sure to continue watching to all that I am putting out. I built a shop to sell my artwork on great gifts. The proceeds go to adding more options and building the Artist Mentoring Network. I will be seeking artists who are willing to chime in voluntarily to help young artists, and student artists.My comic Strip Twisted Fate will be growing, and becoming an animated Flash comic by 2015, and my art lessons will continue to grow. Possibly a book by next year as well. Finally new large pieces of artwork to share with the world. I hope you will continue to join me as I grow as an artist with you. Remember to visit my webpage for news and updates on everything. 
I want to see all of you Rise with me as well. 

Thank you for reading, 
Derrick Rathgeber

Thursday, February 20, 2014

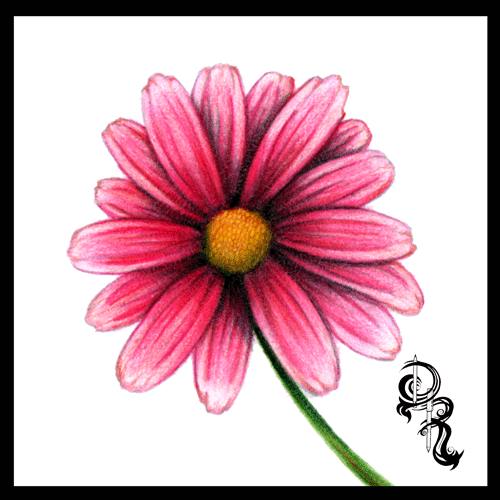
How to Color a Daisy With Colored Pencils

How to Color a Daisy With Colored Pencils

By Derrick Bruno

Http://HalfEvil333.com

Support & Donate by clicking the button below.
Thank you Very Much.

https://www.pinterest.com/pin/60869032437031919/


Let us begin the lesson, and thank you for your support. 

Welcome to the next lesson in colored pencil drawing. In the last lesson we learned how to layer different colors to create a solid multi-colored pink lady apple. In this lesson I will teach you how to train your brain to see your drawing as different individual pieces. The perfect way to do this is with the daisy. We will focus more on directional shading and coloring in this lesson, and how to obtain textures using different strokes.

Grab your box of Colored Pencils out and grab the following colors; Pale pink, Pink, Cerise, Ruby, Light Brown, Golden Yellow, Grass Green, Black, and White. These will be the 9 colors we will be using for this lesson.

Tip: If you would like to change the color of your flower, you may substitute the petal colors (Pale Pink, Pink, Cerise, & Ruby) to another four colors. Just make sure you go from light to dark. For example a purple flower you could use Light Lavender, Lavender, Purple, & Orchid. 

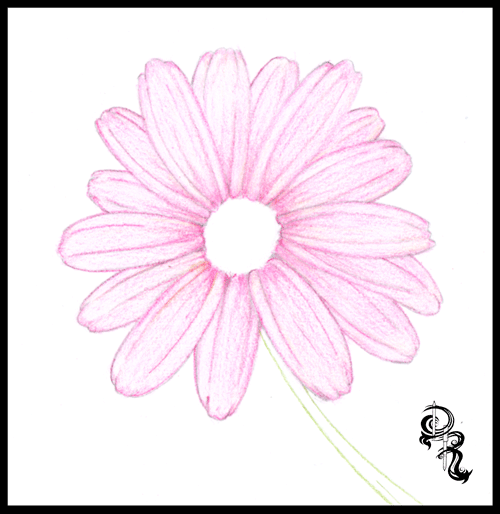
Step 1: Lightly draw your daisy using faint strokes of a pencil, or light grey colored pencil. Start with the circle in the middle of the flower. Follow that with about six individual petals all roughly the same length, but different characteristics. If you note each petal has two fold lines going down the, and the ends are jagged. Behind these petals you will draw more petals. Continue layering your petals until you are satisfied with the shape of your daisy. Now use the Grass Green colored pencil and draw two curved lines for the stem.

Tip: If you would like to skip ahead and focus on the coloring lesson. You may download the sketched out image seen below. Click the link Below.


Step 2: We are going to put down the base color for the flower. Take the Pale Pink Colored Pencil and start coloring in each petal. Now to do this we are going to use a fun technique. The reason I chose a daisy is because it’s a circle shape. You will want to color in the direction of each petal; to do this can get frustrating because you have to contort your hand into uncomfortable positions. So what we are going to do is keep our hand in the same position and rotate the paper. Use light gentle strokes across each petal evenly, and use more pressure on the lines, and towards the center of the flower. Continue rotating the paper and coloring each petal until they are covered.


Step 3: Practice Makes Perfect. Find a petal to start with, and start adding the next layer of color. Using the Pink we will start off at the base of the petal and color in the direction of the petal. Color only the base of the petal and the center area of the petal. Again rotate the paper as you go and color in a position that is most comfortable for you and your wrist. This will allow smoother lines and more control.


Tip: Treat each petal as a new drawing. Taking your time and giving attention to each one will allow your brain to see shapes that you would otherwise over look. Remember to draw comfortably, take breaks when you need them, and just have fun.

Step 4: Using the Cerise you will continue adding more color and depth to the flower. We are going to start adding some shadows and curves to the petals. Color from the base of the petal with more pressure and lighten your strokes as you reach the end of the petal. Define the shadows for the petals underneath by using darker strokes where the top petals overlay.


Step 5: We are going to fine tune the shadow by adding one more red color. Using the Ruby Colored Pencil we will once again add more depth the flower petals. Rotating the paper as you go of course, sharpen your lines toward the base of each petal around the circle. Then define the lines of each petal using the Ruby color. Now as you rotate the paper use back and forth strokes to really get the dark Ruby color to make an even shadow on each petal towards the center of the flower to make it look like the petals fold inward.
Step 6: Now we are going to get into the middle of this flower. Don’t worry no more rotating the paper for this one, unless you want to of course. This part is actually kind of fun for me. Making a realistic pollen look is easier than it looks. Using the Light Brown find the center of your circle and make a much smaller circle. This will be your starting point. Now continue making small circles around this circle, and continue until the center is full. Once you get to the edge of the petals, use the Light Brown to fill in any gaps between the flower center and the petals. Now add some of this brown to the stem with some lines dark lines, and we will move on to the next step.


Step 7: Now it’s time to add some color to the center. Using the Golden Yellow make even circular strokes to fill in the center area. Continue going over it until you get a nice even color. Once you are finished use the same Golden Yellow color and very lightly go over the base of each petal. We do this because light reflects colors onto nearby objects. Sometimes it’s not noticeable, but just enough will make your drawing look that much more realistic. Then to finish off this step add some more light stroke lines onto the stem to give it an earthy browning like color when we go over it with the green.


Step 8: Probably the easiest step of the drawing. Take the Grass Green color, and color the entire stem. Be sure to color right over the Golden Yellow and Light Brown colors. Remember to color along with the shape of the stem in the same direction. You can even rotate the paper to give you a comfortable position and clean lines. Color the area by the flower darker show the shadow of the flower covering the stem.

Tip: By now I hope rotating the paper comes to you as a reflex. This will help you draw strait lines and curves, and can be used to draw all sorts of shapes and objects. Draw smarter not harder.


Step 9: Now to cast the final shadows. Use the Black Colored Pencil and outline the base of each petal and the flower center. Next begin shading the top petals lightly just enough to show that they curve inwards towards the center. Add some more black color to the petals underneath using the top petals as a guide. Next tilt the black pencil to the side a bit, and give a shadow to the center of the flower. Use crosshatching strokes towards the bottom of the circle to make it look like a sphere. Finally cast the shadow on the top, and down the side of the stem to finish up the shadows.
Step 10: To finish up our flower take the White Colored Pencil and color the edge of each petal. Next blend together the light and the dark colors by coloring from the edge of the petal down to the middle of each petal. This will even out your colors, and help cast light onto your drawing. Next add white to the cent of your drawing, and to the stem. And there you have it a beautiful flower.


Tip: Find your light source. Sometimes when I draw I will cast a light over my drawing and see which way the paper casts a shadow. Use this as a guide for your shading.

That does it for this lesson. I would love to see your work. Send it to us and we would be glad to share your results on my Facebook page at
 https://www.facebook.com/HalfEvilProductions

More Free art lessons are available on my Pinterest page at: 

If you would like to ask a question or make a suggestion for a drawing lesson email me at DerrickBruno@HalfEvil333.com

Thank you for coming.
Derrick Bruno

Tuesday, February 18, 2014

My Last and Final Drawing?

My Last and Final Drawing?
by Derrick Rathgeber


Mermaid Legacy

All of us have that one drawing that you will never Ever sell. That is what this one is for me. I don't mind sharing this drawing with the world digitally, but no one is going to hold this drawing on paper, but me or my wife. This small 8 x 10 pencil drawing of a mermaid was almost the last thing I ever illustrated. It would have been my legacy to the world. 

My last and final drawing was drawn on a piece of old note paper in a hospital in Sun City on May 10th 2009. I was in the hospital for a severe kidney disease called Rhabdomyolysis
Let me back up a bit and explain. I was injured back in 2008 when a 150lb steel ladder broke apart and fell on me on the job and a cable service tech. After several attempts to get treated for it, and even more denials from the insurance company I started accumulating a ton of muscle tissue damage that inevitably became permanent. I was forced to go back to work early and taken off my limitations even though my doctor didn't want me to work. After a year of light duty and office work, my parter called in sick when he was on call. Now because the company couldn't get anybody else to fill in they told me either I fix the on-call problems, or I don't have a job anymore. Thinking of my home, and kids I had to work so I had no choice. Looking back on it now I should have told them HELL NO, but then I thought It will hurt like hell but I can sleep it off the next day. 

These were no ordinary job orders, and I can see why my partner "got sick." I did two cable line drops from the pole to the house, one trench for a cable pedestal replacement, and of course the standard installs and disconnects. I worked from 7:00 am - 7:00pm in 110 degree weather with minimal breaks. Needless to say I got home and I don't even remember eating, I just went to bed and slept till noon the next day. 

Feeling completely sore head to toe, and all my torn muscles throbbing, I took my pain medication and decided to do the yoga program I had. It was from the p90x series which was too extreme  but I just did the 10 min warm up because it has all the basic stretch moves. I couldn't even finish it. I was getting dizzy, and told my wife I had to lay down. She let me sleep in the whole day, and around 6:30p.m. I went to the restroom and, not to be too graphic, I pee'd what looked like Coca Cola syrup. It was dark. I yelled to my wife to look, and we were freaked out. She immediately called my sister who is a nurse, and I jumped on the computer to look it up. By the time I found out that it was kidney failure, my sister was yelling at my wife to get me to the hospital NOW. It was weird, as soon as we found out I was already blacking out. 

Forgive me, but I do not remember most of this part. But My wife dragged me from the house to the car, and drove me to the hospital in Blythe, CA. I do remember the doctor telling me to stand up and walk into the back from the wheel chair even though I was blacking out on and off. They would send me into the waiting room until they had a room for me for yet another hour. (This was a prison hospital, and inmates get priority even though its the only hospital for miles.)
After I finally got a room they hooked me up to an i.v. and did blood work. The tests came back and my ck levels were 9,999 basically off the charts. Normal ck levels are within the 100s. The doctor thought was an error and he wanted to release me with some Gatorade for dehydration. If he had I would have been dead. The insurance company made them repeat the test and it was still off the charts, and notified another hospital to take me in. The doctor then apologizes and couldn't even say the diagnosis of Rhabdomyolysis. They were going to fly me by helicoter to Sun City Banner, but unfortunately a young child needed it more so of course I told them go ahead and ship me by ambulance. 

The ambulance ride was another 4 hours to Sun City and once I left I wouldn't see my kids for another two weeks. I hugged them like the last time. My wife rode with me all the way there and my mom and sister watched the kids. I don't remember much of the ride as I faded in and out again. When I got there they were ready for me. They did tests on the hour, and pumped fluids into me. After I found out my liver was also crashing I was terrified. My levels were falling, and climbing, but I wasn't blacking out, just getting weak and dizzy from walking. About a week into it I was told by the nurse if my levels didn't drop any more I would have dialysis. I asked the nurse for some paper and a pencil and asked my wife what would you like for me to draw for you? 

It seemed like a simple question, and I smiled away. But I wasn't sure if I was going to get better. I wanted to draw something for her in case I couldn't do it anymore. I had never been more scared in my life. I have been hit by cars, attacked, heart surgery and I was never scared, but this time I was. I never told my wife that, but I am sure she will read this, or already knew because she can read me like an open book. I drew her a mermaid that I thought she would like to see. Fun sketchy, not perfect but beautiful like her. I had to add my swirls, and tribal designs that way she would say yep its him that't how he always drew his characters. Would this be my last I sure hoped not. Now they did take me to dialysis, and my wife said I was gone for hours. I think I was out for hours because I don't remember. They had to flush them completely, and I was not there with her. 

After another week I finally got the news I wanted to hear. My levels dropped under 1500, and I could go home. I was so thrilled! I got to see my kids again! I got to be home, my home, my bed! I still had to follow up with my doctor for blood work every three days for monitoring, and I was finally taken off work. I guess its true you do have to die to have your work comp company take you seriously. I never told anyone this before but I am sure I did for a minute or two, maybe a dream maybe not. But I am here now and that's what matters. I was home. 

That was much longer than I thought. But it's all true, and this drawing title Mermaid Legacy was nearly my last and final drawing. It would have been my legacy to the world. Now it's a reminder for myself that I am here, and should have died many times over in this experience  but I feel I was kept alive. This drawing wasn't my last drawing but for me it's the first of many many more. I am here still recovering, still hurt, and not treated. But now I can listen to my body and say no to unfair treatment, and fight. I decided no matter my situation I will choose my family, life, and find my reason for being here. I want to help others including other artists, and share my story as and artist. Maybe there is someone who could use it. Just writing it out today helped me. 

Thank you for reading, 
Derrick Rathgeber 
http://DerricktheArtist.com

You can also view Mermaid Legacy 

Monday, February 10, 2014

Deal of the Day! Today Only 50% Off ALL Kids T-Shirts

50% off All Kids T-Shirts. 
Grab a stylish shirt for your little one! 

Comfortable, casual and loose fitting, the Kids' Basic Hanes Tagless T-Shirt is a family favorite. Made from 6.0 oz, pre-shrunk 100% cotton, this crew neck shirt wears well on kids of all sizes. Fits true to size.

USE CODE: KIDSTHALFOFF


Friday, February 7, 2014

Don't Miss Out! Visit http://DerricktheArtist.com

What your missing out on 


1. An Online Art Gallery

2. Free Art Lessons

3. Free Web Comic With a new comic each month. 

4. Great Art for sale at affordable pricing. 

5. Shop for great gifts from t-shirts, coffee mugs, accessories with daily 


deals and specials. 

6. Artwork Prints with custom framing and canvas options. 


7. My blog page featuring advice, tips, lessons, and more.


8. A full links page to more great artists from all over the globe.


9. A Convenient forms page to request a free quote for your nex


project. 


Visit today and Don't miss out.

#art #artlessons #webcomic #comic #humor #sale #print #artprint #tshirt #coffee #mug #accessories #deals #special #canvas #world#Form #quote #project #DerricktheArtist

In Feed AD