Thursday, February 20, 2014

How to Color a Daisy With Colored Pencils

How to Color a Daisy With Colored Pencils

By Derrick Bruno

Http://HalfEvil333.com

Support & Donate by clicking the button below.
Thank you Very Much.

https://www.pinterest.com/pin/60869032437031919/


Let us begin the lesson, and thank you for your support. 

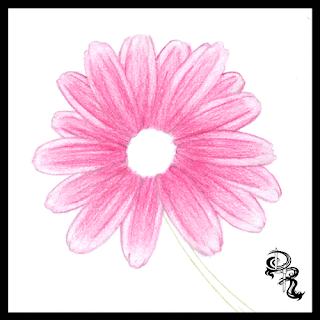
Welcome to the next lesson in colored pencil drawing. In the last lesson we learned how to layer different colors to create a solid multi-colored pink lady apple. In this lesson I will teach you how to train your brain to see your drawing as different individual pieces. The perfect way to do this is with the daisy. We will focus more on directional shading and coloring in this lesson, and how to obtain textures using different strokes.

Grab your box of Colored Pencils out and grab the following colors; Pale pink, Pink, Cerise, Ruby, Light Brown, Golden Yellow, Grass Green, Black, and White. These will be the 9 colors we will be using for this lesson.

Tip: If you would like to change the color of your flower, you may substitute the petal colors (Pale Pink, Pink, Cerise, & Ruby) to another four colors. Just make sure you go from light to dark. For example a purple flower you could use Light Lavender, Lavender, Purple, & Orchid. 

Step 1: Lightly draw your daisy using faint strokes of a pencil, or light grey colored pencil. Start with the circle in the middle of the flower. Follow that with about six individual petals all roughly the same length, but different characteristics. If you note each petal has two fold lines going down the, and the ends are jagged. Behind these petals you will draw more petals. Continue layering your petals until you are satisfied with the shape of your daisy. Now use the Grass Green colored pencil and draw two curved lines for the stem.

Tip: If you would like to skip ahead and focus on the coloring lesson. You may download the sketched out image seen below. Click the link Below.


Step 2: We are going to put down the base color for the flower. Take the Pale Pink Colored Pencil and start coloring in each petal. Now to do this we are going to use a fun technique. The reason I chose a daisy is because it’s a circle shape. You will want to color in the direction of each petal; to do this can get frustrating because you have to contort your hand into uncomfortable positions. So what we are going to do is keep our hand in the same position and rotate the paper. Use light gentle strokes across each petal evenly, and use more pressure on the lines, and towards the center of the flower. Continue rotating the paper and coloring each petal until they are covered.


Step 3: Practice Makes Perfect. Find a petal to start with, and start adding the next layer of color. Using the Pink we will start off at the base of the petal and color in the direction of the petal. Color only the base of the petal and the center area of the petal. Again rotate the paper as you go and color in a position that is most comfortable for you and your wrist. This will allow smoother lines and more control.


Tip: Treat each petal as a new drawing. Taking your time and giving attention to each one will allow your brain to see shapes that you would otherwise over look. Remember to draw comfortably, take breaks when you need them, and just have fun.

Step 4: Using the Cerise you will continue adding more color and depth to the flower. We are going to start adding some shadows and curves to the petals. Color from the base of the petal with more pressure and lighten your strokes as you reach the end of the petal. Define the shadows for the petals underneath by using darker strokes where the top petals overlay.


Step 5: We are going to fine tune the shadow by adding one more red color. Using the Ruby Colored Pencil we will once again add more depth the flower petals. Rotating the paper as you go of course, sharpen your lines toward the base of each petal around the circle. Then define the lines of each petal using the Ruby color. Now as you rotate the paper use back and forth strokes to really get the dark Ruby color to make an even shadow on each petal towards the center of the flower to make it look like the petals fold inward.
Step 6: Now we are going to get into the middle of this flower. Don’t worry no more rotating the paper for this one, unless you want to of course. This part is actually kind of fun for me. Making a realistic pollen look is easier than it looks. Using the Light Brown find the center of your circle and make a much smaller circle. This will be your starting point. Now continue making small circles around this circle, and continue until the center is full. Once you get to the edge of the petals, use the Light Brown to fill in any gaps between the flower center and the petals. Now add some of this brown to the stem with some lines dark lines, and we will move on to the next step.


Step 7: Now it’s time to add some color to the center. Using the Golden Yellow make even circular strokes to fill in the center area. Continue going over it until you get a nice even color. Once you are finished use the same Golden Yellow color and very lightly go over the base of each petal. We do this because light reflects colors onto nearby objects. Sometimes it’s not noticeable, but just enough will make your drawing look that much more realistic. Then to finish off this step add some more light stroke lines onto the stem to give it an earthy browning like color when we go over it with the green.


Step 8: Probably the easiest step of the drawing. Take the Grass Green color, and color the entire stem. Be sure to color right over the Golden Yellow and Light Brown colors. Remember to color along with the shape of the stem in the same direction. You can even rotate the paper to give you a comfortable position and clean lines. Color the area by the flower darker show the shadow of the flower covering the stem.

Tip: By now I hope rotating the paper comes to you as a reflex. This will help you draw strait lines and curves, and can be used to draw all sorts of shapes and objects. Draw smarter not harder.


Step 9: Now to cast the final shadows. Use the Black Colored Pencil and outline the base of each petal and the flower center. Next begin shading the top petals lightly just enough to show that they curve inwards towards the center. Add some more black color to the petals underneath using the top petals as a guide. Next tilt the black pencil to the side a bit, and give a shadow to the center of the flower. Use crosshatching strokes towards the bottom of the circle to make it look like a sphere. Finally cast the shadow on the top, and down the side of the stem to finish up the shadows.
Step 10: To finish up our flower take the White Colored Pencil and color the edge of each petal. Next blend together the light and the dark colors by coloring from the edge of the petal down to the middle of each petal. This will even out your colors, and help cast light onto your drawing. Next add white to the cent of your drawing, and to the stem. And there you have it a beautiful flower.


Tip: Find your light source. Sometimes when I draw I will cast a light over my drawing and see which way the paper casts a shadow. Use this as a guide for your shading.

That does it for this lesson. I would love to see your work. Send it to us and we would be glad to share your results on my Facebook page at
 https://www.facebook.com/HalfEvilProductions

More Free art lessons are available on my Pinterest page at: 

If you would like to ask a question or make a suggestion for a drawing lesson email me at DerrickBruno@HalfEvil333.com

Thank you for coming.
Derrick Bruno
Tuesday, February 18, 2014

My Last and Final Drawing?

My Last and Final Drawing?
by Derrick Rathgeber


Mermaid Legacy

All of us have that one drawing that you will never Ever sell. That is what this one is for me. I don't mind sharing this drawing with the world digitally, but no one is going to hold this drawing on paper, but me or my wife. This small 8 x 10 pencil drawing of a mermaid was almost the last thing I ever illustrated. It would have been my legacy to the world. 

My last and final drawing was drawn on a piece of old note paper in a hospital in Sun City on May 10th 2009. I was in the hospital for a severe kidney disease called Rhabdomyolysis
Let me back up a bit and explain. I was injured back in 2008 when a 150lb steel ladder broke apart and fell on me on the job and a cable service tech. After several attempts to get treated for it, and even more denials from the insurance company I started accumulating a ton of muscle tissue damage that inevitably became permanent. I was forced to go back to work early and taken off my limitations even though my doctor didn't want me to work. After a year of light duty and office work, my parter called in sick when he was on call. Now because the company couldn't get anybody else to fill in they told me either I fix the on-call problems, or I don't have a job anymore. Thinking of my home, and kids I had to work so I had no choice. Looking back on it now I should have told them HELL NO, but then I thought It will hurt like hell but I can sleep it off the next day. 

These were no ordinary job orders, and I can see why my partner "got sick." I did two cable line drops from the pole to the house, one trench for a cable pedestal replacement, and of course the standard installs and disconnects. I worked from 7:00 am - 7:00pm in 110 degree weather with minimal breaks. Needless to say I got home and I don't even remember eating, I just went to bed and slept till noon the next day. 

Feeling completely sore head to toe, and all my torn muscles throbbing, I took my pain medication and decided to do the yoga program I had. It was from the p90x series which was too extreme  but I just did the 10 min warm up because it has all the basic stretch moves. I couldn't even finish it. I was getting dizzy, and told my wife I had to lay down. She let me sleep in the whole day, and around 6:30p.m. I went to the restroom and, not to be too graphic, I pee'd what looked like Coca Cola syrup. It was dark. I yelled to my wife to look, and we were freaked out. She immediately called my sister who is a nurse, and I jumped on the computer to look it up. By the time I found out that it was kidney failure, my sister was yelling at my wife to get me to the hospital NOW. It was weird, as soon as we found out I was already blacking out. 

Forgive me, but I do not remember most of this part. But My wife dragged me from the house to the car, and drove me to the hospital in Blythe, CA. I do remember the doctor telling me to stand up and walk into the back from the wheel chair even though I was blacking out on and off. They would send me into the waiting room until they had a room for me for yet another hour. (This was a prison hospital, and inmates get priority even though its the only hospital for miles.)
After I finally got a room they hooked me up to an i.v. and did blood work. The tests came back and my ck levels were 9,999 basically off the charts. Normal ck levels are within the 100s. The doctor thought was an error and he wanted to release me with some Gatorade for dehydration. If he had I would have been dead. The insurance company made them repeat the test and it was still off the charts, and notified another hospital to take me in. The doctor then apologizes and couldn't even say the diagnosis of Rhabdomyolysis. They were going to fly me by helicoter to Sun City Banner, but unfortunately a young child needed it more so of course I told them go ahead and ship me by ambulance. 

The ambulance ride was another 4 hours to Sun City and once I left I wouldn't see my kids for another two weeks. I hugged them like the last time. My wife rode with me all the way there and my mom and sister watched the kids. I don't remember much of the ride as I faded in and out again. When I got there they were ready for me. They did tests on the hour, and pumped fluids into me. After I found out my liver was also crashing I was terrified. My levels were falling, and climbing, but I wasn't blacking out, just getting weak and dizzy from walking. About a week into it I was told by the nurse if my levels didn't drop any more I would have dialysis. I asked the nurse for some paper and a pencil and asked my wife what would you like for me to draw for you? 

It seemed like a simple question, and I smiled away. But I wasn't sure if I was going to get better. I wanted to draw something for her in case I couldn't do it anymore. I had never been more scared in my life. I have been hit by cars, attacked, heart surgery and I was never scared, but this time I was. I never told my wife that, but I am sure she will read this, or already knew because she can read me like an open book. I drew her a mermaid that I thought she would like to see. Fun sketchy, not perfect but beautiful like her. I had to add my swirls, and tribal designs that way she would say yep its him that't how he always drew his characters. Would this be my last I sure hoped not. Now they did take me to dialysis, and my wife said I was gone for hours. I think I was out for hours because I don't remember. They had to flush them completely, and I was not there with her. 

After another week I finally got the news I wanted to hear. My levels dropped under 1500, and I could go home. I was so thrilled! I got to see my kids again! I got to be home, my home, my bed! I still had to follow up with my doctor for blood work every three days for monitoring, and I was finally taken off work. I guess its true you do have to die to have your work comp company take you seriously. I never told anyone this before but I am sure I did for a minute or two, maybe a dream maybe not. But I am here now and that's what matters. I was home. 

That was much longer than I thought. But it's all true, and this drawing title Mermaid Legacy was nearly my last and final drawing. It would have been my legacy to the world. Now it's a reminder for myself that I am here, and should have died many times over in this experience  but I feel I was kept alive. This drawing wasn't my last drawing but for me it's the first of many many more. I am here still recovering, still hurt, and not treated. But now I can listen to my body and say no to unfair treatment, and fight. I decided no matter my situation I will choose my family, life, and find my reason for being here. I want to help others including other artists, and share my story as and artist. Maybe there is someone who could use it. Just writing it out today helped me. 

Thank you for reading, 
Derrick Rathgeber 
http://DerricktheArtist.com

You can also view Mermaid Legacy 

Monday, February 10, 2014

Deal of the Day! Today Only 50% Off ALL Kids T-Shirts

50% off All Kids T-Shirts. 
Grab a stylish shirt for your little one! 

Comfortable, casual and loose fitting, the Kids' Basic Hanes Tagless T-Shirt is a family favorite. Made from 6.0 oz, pre-shrunk 100% cotton, this crew neck shirt wears well on kids of all sizes. Fits true to size.

USE CODE: KIDSTHALFOFF


Friday, February 7, 2014

Don't Miss Out! Visit http://DerricktheArtist.com

What your missing out on 


1. An Online Art Gallery

2. Free Art Lessons

3. Free Web Comic With a new comic each month. 

4. Great Art for sale at affordable pricing. 

5. Shop for great gifts from t-shirts, coffee mugs, accessories with daily 


deals and specials. 

6. Artwork Prints with custom framing and canvas options. 


7. My blog page featuring advice, tips, lessons, and more.


8. A full links page to more great artists from all over the globe.


9. A Convenient forms page to request a free quote for your nex


project. 


Visit today and Don't miss out.

#art #artlessons #webcomic #comic #humor #sale #print #artprint #tshirt #coffee #mug #accessories #deals #special #canvas #world#Form #quote #project #DerricktheArtist

Thursday, February 6, 2014

Derrick the Artist: How to Color a Delicious Pink Lady Apple with Colored Pencils

How to Color a Delicious Pink Lady Apple
by Derrick Rathgeber


Thank you for choosing me to help you grow as an artist. I do this all for free because I know how many other artists there who can use them, and it really makes my day to hear the responses about how much they help. Even more so I would like to keep the Art Lessons and Web Comics FREE. Anything you can help with will help me keep that promise. Visit my donation page below to donate, or message me if you can help in other ways. ie. Supplies, publications ect..
Thank you for all your support.
Derrick Rathgeber


RoseArt Colored Pencils we will be using.
White
Golden Yellow
True Orange
Bronze Yellow
Celery
Cardinal Red
Cherry Red
Raspberry
Brown
Black

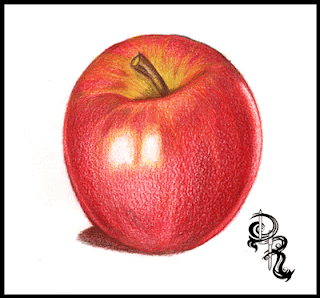
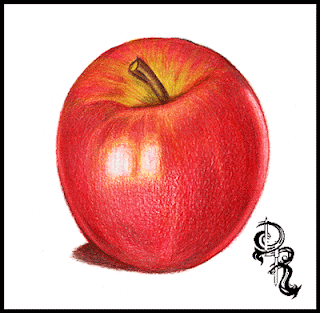
Welcome to the great drawing lessons here on Derrick the Artist. Today I will be teaching you how to color your very own delicious pink lady apple. In this exercise I will give you tips on how to over lay colors, blend them to create lights and shadows, as well as textures. So let’s get started shall we.

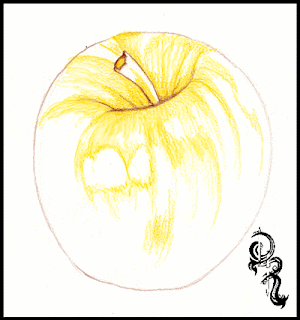
Step 1: If you are comfortable with your drawing skills start off your picture by drawing the apple shape below with the brown colored pencil. Remember your apple does not have to be a perfect shape because no apple is a perfect sphere.
Tips: A PDF version is available if you would like to skip this step and go right into the coloring.Download the printable version by clicking the link below:


Step 2: Using the Golden Yellow make dark to light strokes outlining the shine. Start at the base of the step and define the shape of the apple. This color will act as the base and guide for the rest of the colors to come. Next use the Bronze Yellow and darken the yellow areas on the stem and the area around the stem. This will help blend into the green Celery color in the next step.

Tips: Use more pressure on the pencil at the edges and around the shine areas, then slowly raise the pencil up decreasing the pressure of the pencil.
Step 3: Using the Celery color you will go over the Golden Yellow color on the top of the apple. Start from the base of the stem and create line in arcs to the rim of the apple, then fill them in with the Celery green covering a good area of the top, but leave some areas available for the red to come through. Also add some Celery color to the stem as well.
Step 4: Now it’s time to set the base for rest of the apple. Using the True Orange we will start from the stem base and color the apple almost like a pumpkin. Fill in the top half of the apple leaving small empty spaces along the edge, and along the base of the bottom. Keep a white strip-like area empty along the right side of the apple, as this will act as a reflective shine making the apple look more realistic.
Tips: References are great. If you have an apple at home shine a light on it to see how light shines and reflects on it so you can replicate this effect in your drawing.


Step 5: It’s time to watch your apple come to life. Use the Cardinal Red and cover the apple in nice even strokes with the apple from top to bottom and at a curve. Remember to leave the large shine in the center, and on the right clear. I like to rotate the paper so I can keep my hand still and move only the pencil across the paper. Once the apple is covered evenly begin adding pressure and coloring in areas darker near the edges and the top of the apple. Leave the area near the large shine lightened as shown in the picture.
Tips: Try to keep your pencil stokes in one direction. In this case arc them downward creating the illusion of a round object. After you have covered the area you can crosshatch to darken areas of the drawing.


Step 6: The candy apple read that makes you drool. That’s what we are going for. So let’s add the next layer of red. This time we are using Cherry Red to help fill in gaps, smooth out our fruit, and generate a one of a kind look. Starting at the borders of the apple we are going to go over theCardinal Red and start coloring towards the shine lightening our strokes along the way. Also get the top of the apple, and overlay the red partially over the yellows and greens to pull it all together. When you are satisfied with the look of your apple, move on to the next layer of red in the next step. Yep that’s right Three layers of red.
Step 7: This is the last layer of red I promise. Grab the Raspberry Red colored pencil and use heavy pressure along the areas you want to add shadows to. You can use the image as reference or use your gut. Get the areas close to the edges, and highlight the shine on the top near the stem. At this point your apple will have a realistic shine and reflect the paper it is drawn on. As an option also use this color to create a shadow on the floor. Remember where your light is coming from and color your shadow based on that. In this case I have light coming from the rear and the front so the shadow is outlined as shown.
Tips: If your drawing doesn’t look like the image shown do not worry. If I were to draw this again mine would look different too. Remember to enjoy yourself and take your time.


Step 8: Time to give your apple an earthy look, and finally give that stem some color. Reach for theBrown and fill in the stem from base to top leaving some green color. Remember to color with the stem shape, and for an extra measure of realism sketch some harder lines. Next add a layer of brown across the entire apple, and the shadow. Remember to leave the shines white. Adjust your pressure to the level that you want. This gives the apple some more texture, and colors to capture the eye.
Tip: If you would like to color the apple with other colors you can use these techniques with most fruit and objects. Simple adjust your color palette, and have fun.


Step 9: We are now heading to the final touch ups. Get a hold of the Black pencil and we will finalize the shadows. Start off by coloring over the shadow on the ground. Once you are finished start darkening the left side using the shines as a guide to stop. On the right side of the apple you will start from the white strip and go from heavy pressure to light pressure as you meet in the middle. Then add some dark areas in the stem to show that the apple dips in. Once you are satisfied with your look we will move on to the final step.
Tips: Black is your friend. With colored pencils you can cover other colors without making over shadowing them completely. If you need to go darker simply add another layer.
Step 10: And we are at the finish line! This step is probably one that most people don’t see coming. Go ahead and take the white pencil, and start coloring over the entire apple. You will notice that as you color the colors will not only lighten up but they will blend together and smoothen out. This is probably one of the greatest kept secrets, and now you know. The white colored pencil is probably the most important pencil in your collection.
Thank you for visiting and I hope you enjoyed this lesson. More are available right here on my blog page, and at http://RoseArt.com/Blog. Be sure to check out my website for more updates, and upcoming lessons, and new art at http://DerricktheArtist.com.
Upload your lesson results on my Facebook page. Each month I will giving away great prizes, all you have to do is share your results with me at: http://Facebook.com/DerricktheArtist. Remember to have fun with it. 

Shop for Great Gifts by Derrick the Artist

http://Zazzle.com/DerricktheArtist

Find what you're looking for yourself or great gifts for your friends. You'll find unique merchandise with my art on t-shirts, sweatshirts, mugs, stickers, and more.


Browse other gifts from Zazzle.

In Feed AD